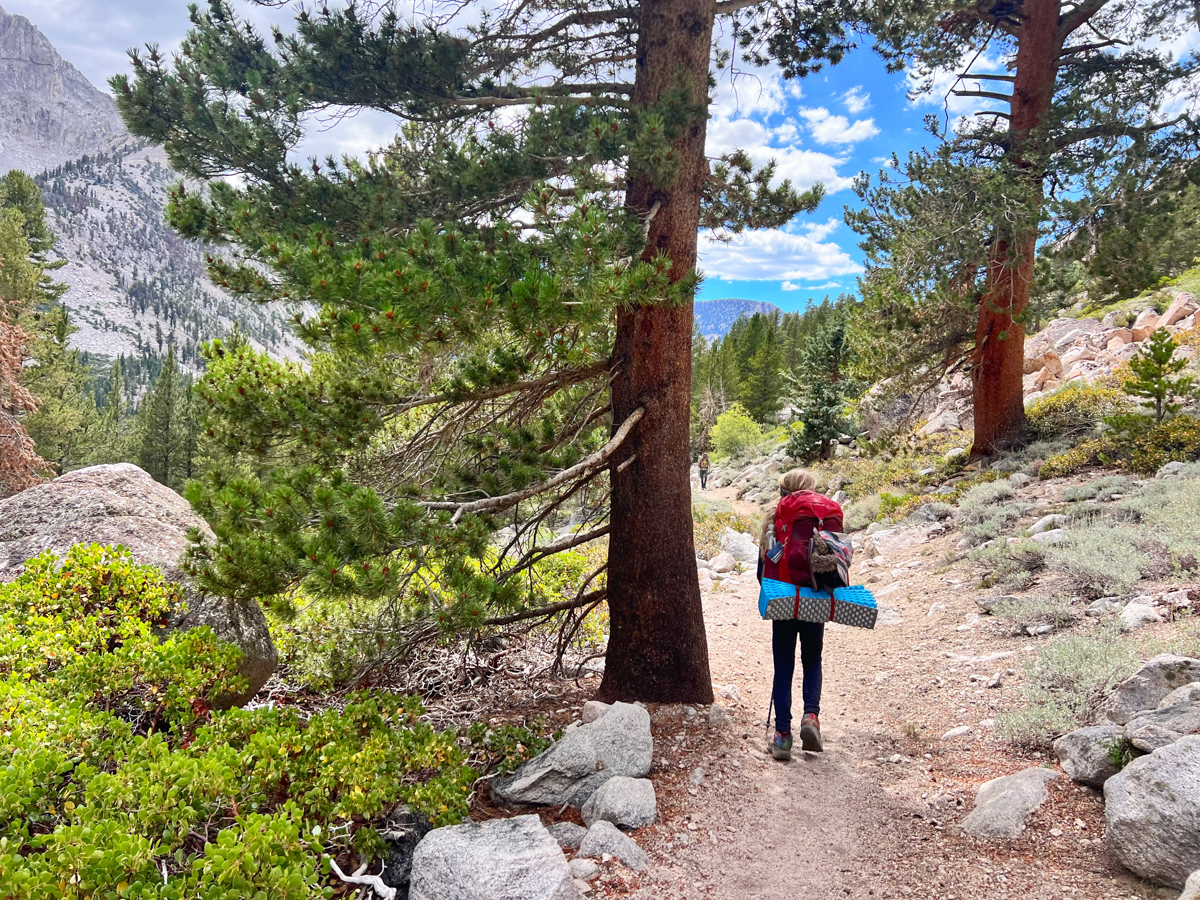
Are you planning your first backpacking trip (or your 100th) and looking to get your backpacking packing list sorted? You have come to the right place. I am a super list maker and love sharing my lists with others! After tons of research and many hundreds of miles of backpacking under our belt, we wanted to share with you exactly what we take on our backpacking trips and what we leave behind. (See below to download a FREE printable backpacking checklist)
In this backpacking checklist, I share every item I bring on a 3-day backpacking trip in the late spring, summer, and fall seasons. I hope that this backpacking gear list will help simplify your planning, help you figure out what you need, and if you are just starting backpacking, give you some good recommendations for backpacking gear to invest in that will last you many years.
Don’t forget to check out our post on backpacking hacks and tips to help your packing go smoothly even on a first trip!
Disclosure: Some of the links in this post are affiliate links, meaning at no additional cost to you, I will earn a commission if you click through and make a purchase.
Jump to a Heading Below
Backpacking Packing List Essentials: The Big Items
 These are the core essential backpacking items that will be included on every trip you take, regardless of where it is or how long it is for. When starting out you may feel like you can’t afford all of these, but it is ok to start with cheaper gear or even renting gear from REI and work your way to lighter, more expensive gear as you go.
These are the items that will probably weight the most and cost the most, so it’s useful to save up and buy the best that you can afford at the beginning.
Again these are the items that we actually take with us while backpacking – there are tons of other options out there, but this gives you a good starting point.
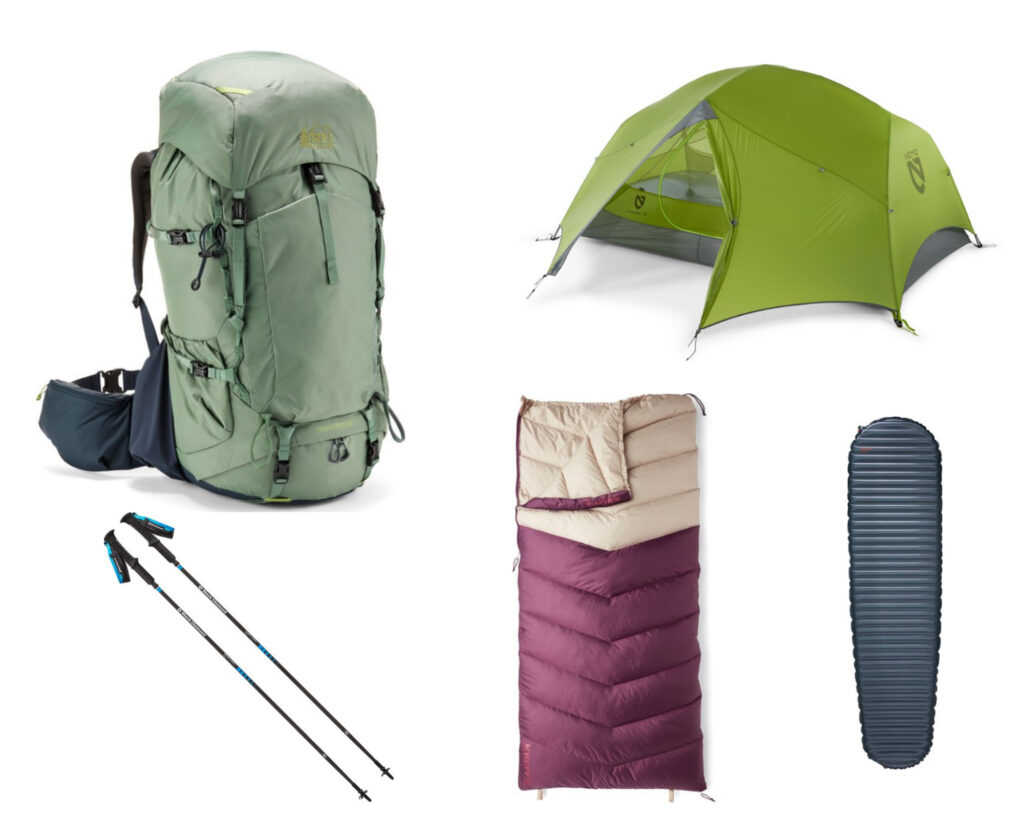
Backpacking Backpack
After trying on a ton of different backpacks, I finally settled on the REI Traverse 60. The important thing to remember is to find one that fits you the best and feels the most comfortable and fits all of your gear. I also really liked the REI Flash, but as it is SUPER lightweight, and it didn’t feel as durable when using a bear canister. For many people though it is really important what your pack weight is when empty. For me, it was comfort first. It is a good idea to get fitted by professionals at REI to really understand what size bag you need and then try them on from that point.
Other options women really like is the Gregory Deva. This was a second runner up for me, but just didn’t fit quite as well.
I had hoped to go with a smaller 40-50L backpack, but since I have to carry the larger bear canister for both of us, those just didn’t work for me.
My 12 year old has the Osprey Ace 38, which has worked well for travel and backpacking.
Sleeping Pad
I absolutely love my car camping sleeping pad, so I was sad to get a new one for backpacking, but it was necessary. It was important for me to go with the lightest, most comfortable one on the market, because sleep is king in my book. I bought this Therm-a-Rest inflatable pad. My son uses the foam pad for himself. My inflatable pad sort of feels flimsy and like a thin garbage bag when you take it out for the first time, but it is lightweight, easy to pack and is perfect to sleep on. I am very happy with it. In recent years more and more folks have been recommending the Nemo ultralight weight pad. I find that it is pretty noisy when used with a Big Agnes tent, but maybe it’s just me!
Sleeping Bag
We are big fans of down sleeping bags and recommend getting a great lightweight bag for all of your camping adventures, not just backpacking. We do not often camp in frigid temperatures. Our bags are 10 degrees for my son and 25 degrees for myself. On our first few trips, we went with the bags we already had – this Kelty square bag and my son had this down bag from REI, but it is a bit heavier than I would purchase for him now. If that is all you have, try it out and only invest in more expensive bags once you know this is your thing.
After years of backpacking with heavier gear, we finally upgraded to more lightweight gear, including the Zenbivy quilt system. We LOVE our quilts and wouldn’t change a thing now. They are SO warm, super light and provide more warmth when needed with the clip in system. This system provides the best of both worlds – the snugness of a sleeping bag with the flexibility of a quilt.
Backpacking Tent
This is a backpacking essential where you can really shave off weight depending on how much you are willing to spend and how big of a tent you want. Since it is just me and my 12 year old at the moment, we went for the lightest tent we could afford even though it’s a bit smaller than we would normally like. But unless it is raining, you aren’t spending a ton of time in the tent anyway. (And we have spent an entire 24 hours trapped in it in torrential rain – we survived!)
We love the Nemo brand tents. We have the Nemo Hornet which is great lightweight tent for 2 smaller people. We have used our friends Nemo Dagger which we also really loved. It’s a bit heavier though so we opted for the smaller, lighter tent.
If you really have some cash to burn and can manage with fiddling, consider the super light weight tents suchs as this one that is uber lightweight and spacious.
Trekking Poles
Yes these are under essentials. Not everyone needs them, but I need them while going up hills and especially going down hills! Trekking poles are essential for crossing rivers safety with a big pack as well. The trekking poles we have are actually these children poles. We have had them forever and LOVE them, but understand they won’t work for everyone. Regardless, I highly recommend any of Black Diamond poles and to get the lightest pair you can afford. These are the ones I would upgrade to if something happened to ours!
Want to know how much everything weighs and keep track of it? Check out this cool website LighterPack where you can enter all of your gear to see what you might need to cut out.
Backpacking Gear List: Water Necessities
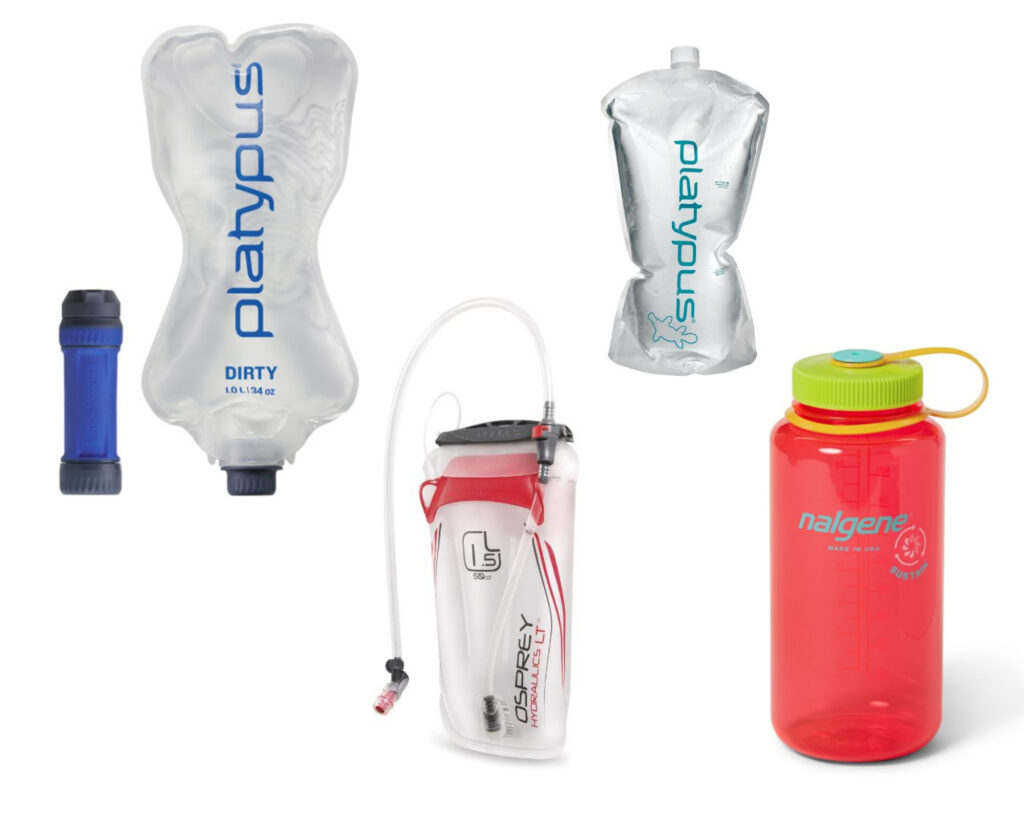 I put this in it’s own section, because it is one of the most important things you will need to consider on your backpacking trips. How much water to bring, have and how to get clean water. In my opinion, you need three main things on your backpacking packing list – a water bladder/reservoir that fits into your bag easily, a reliable water filter and water bottles for extra water storage.
Water Reservoir
We have several water reservoir/bladders that we use on a regular basis. For the most part, we both use a 1.5 L Osprey hydration reservoir/bladder, however many people do recommend going higher with a 3L. For a trip where we might have less access to water we would consider bringing that, but they do not fit into our bags with the bear canister as well as the smaller bag. Also note, water weighs about 2.2 lbs for each liter, so this is where a lot of weight comes in.
Water Filter
We have tried a few different water filters through the years. What we used on our first few backpacking trips (the Platypus Quickdraw and the Sawyer Squeeze), we now no longer use! Between the two of these, the one we preferred was the Platypus as it was light and much easier to use than the much more recommended Sawyer.
These days however, our favorite water filter is actually the Katadyn. We have this in both the 1L and the 3LZ (the 3 liter is only available on Amazon). I prefer the 1L even though it means more water refills. It just squeezes out more easily than the 3L. However, we usually take both and end up using the 3L at night to refill all of our water bottles for the next day and for meals. For water sources that aren’t nearby it is much easier.
Some people also suggest bringing an alternative water treatment system just in case, which is why we always have the two with us in case one breaks.
Water Bottles
When you think of backpackers, you probably think of seeing them with Nalgene bottles hanging off their packs. While we like our Nalgene bottles, I will say that the most preferred water bottle for backpackers is actually a Smart Water bottle. These are sturdy water bottles, slim and still hold a liter like the Nalgene does. On our first backpacking trip, we took both – one of each and preferred the Smartwater bottle 9/10 times. It fit perfectly with the water filter we used, was light enough to always bring with us even on day hikes and was easier to drink out of without spilling. After completing the JMT and many other backpacking trips, its safe to say our nalgene doesn’t ever come with us!
Curious how it is to hike the John Muir Trail with a child? Read about our experiences.
Roll-Up Water Bag
In addition to the water bottles, we used to also take a super lightweight rollup Platypus 2L water bag. This is great to use as either an additional dirty water bag to be filtered later or to carry extra water with you during long stretches without water. It is light enough that I would always consider bringing this regardless. Now that we hike with both the 1 and 3 liter Katadyn water filters, we leave this at home.
Backpacking Kitchen Essentials
 The backpacking kitchen is one place where you can get really thrifty and do various things. I’m not one for messing with lots of parts and gadgets, so we opted for simple, light and reliable.
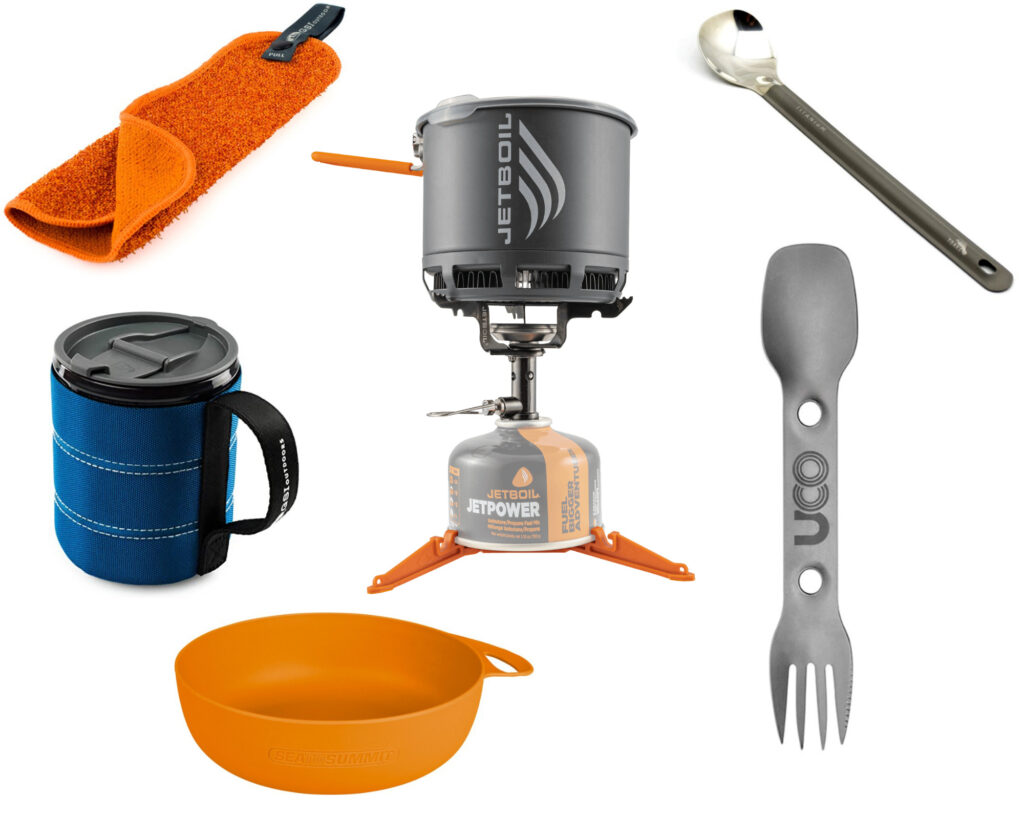
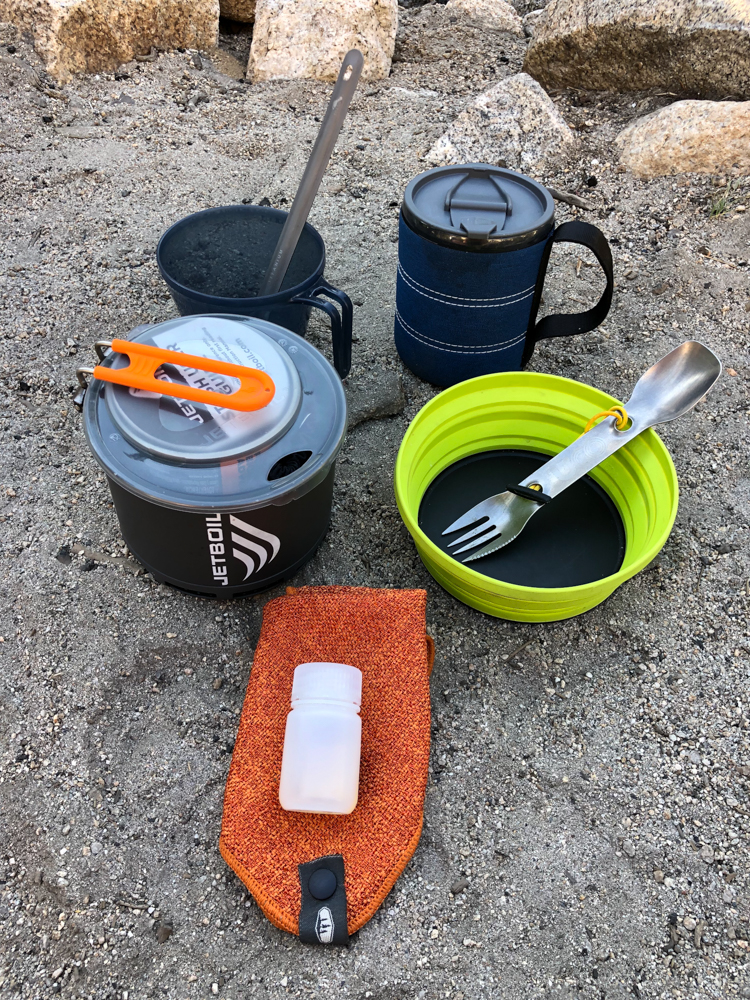
Backpacking Camping Stove
While some people opt to camp without a backpacking stove, I am not one of those people! I like to have a few creature comforts and my 12 year old doesn’t think it’s a meal unless it’s hot! We decided to go for the new Jetboil Stash as it is all in one and packs into one small container. After several years of use I can attest that we still absolutely LOVE it. You can snap the fuel into the pot and it even has space for a small lighter or matchbox. Other people like the MSR pocket rocket and then you can buy/bring the different pots and pans based on what your needs are. For us, for now, we try to just go light and minimal with making foods that just need hot water.
Fuel
Don’t forget your fuel canister for whatever brand stove you buy. We brought an extra fuel canister which we did not need. Would I bring an extra again.. maybe for a longer trip than 3 days, but on 3 days we boiled water 13 times and still had plenty of fuel left over. It’s hard to know exactly how many burns you will get when you are at varying elevations and depending on the wind, so I would suggest always going with one full can. For bigger groups/families, bring a few!
Lighter
I bought a small Bic lighter that was perfect. There are also waterproof matches that would be good, but you would need to bring the burnt match back out with you!
Spork
We brought two of these sporks which we LOVE. These were in our regular day pack hiking packs long before backpacking. We also bought one of these long spoons which actually was pretty great to have as well. If we wanted to cut down an ounce we might consider leaving one spork at home and going with only 1 and the long spoon.
As the years have progressed, we now have 2 long spoons and that is all that we take.
Small Knife
I brought a tiny Swiss Army knife and my son brought his regular pocket knife. He used his for carving wood while at camp. I used the scissors on mine to cut moleskin. Some people recommend the Trango, but we don’t have one (yet!) so I can’t say for sure how light or useful it is at this point. But it is on my future list.
Bowl
My son insisted on bringing his favorite collapsible bowl. I would not bring this bowl again, rather I would find one that didn’t have the grooves in it. I found it difficult to efficiently clean his bowl. That said, we did enjoy having a bowl to share our food more easily. This is a great bowl for pets however or just storing water. After those first few trips, we ended up with this Seat to Summit bowl, which has been a mainstay. It does not collapse, but can clip to the outside of the bag if needed and it cleans super easily.
Cup
We brought one cup for each of us – two different types. One was this GSI mug which I love, but is a bit heavier if you are really trying to save a few grams. We also had this simple measuring cup which worked great for measuring out our water for cooking as well as for hot chocolate and eating oatmeal out of.
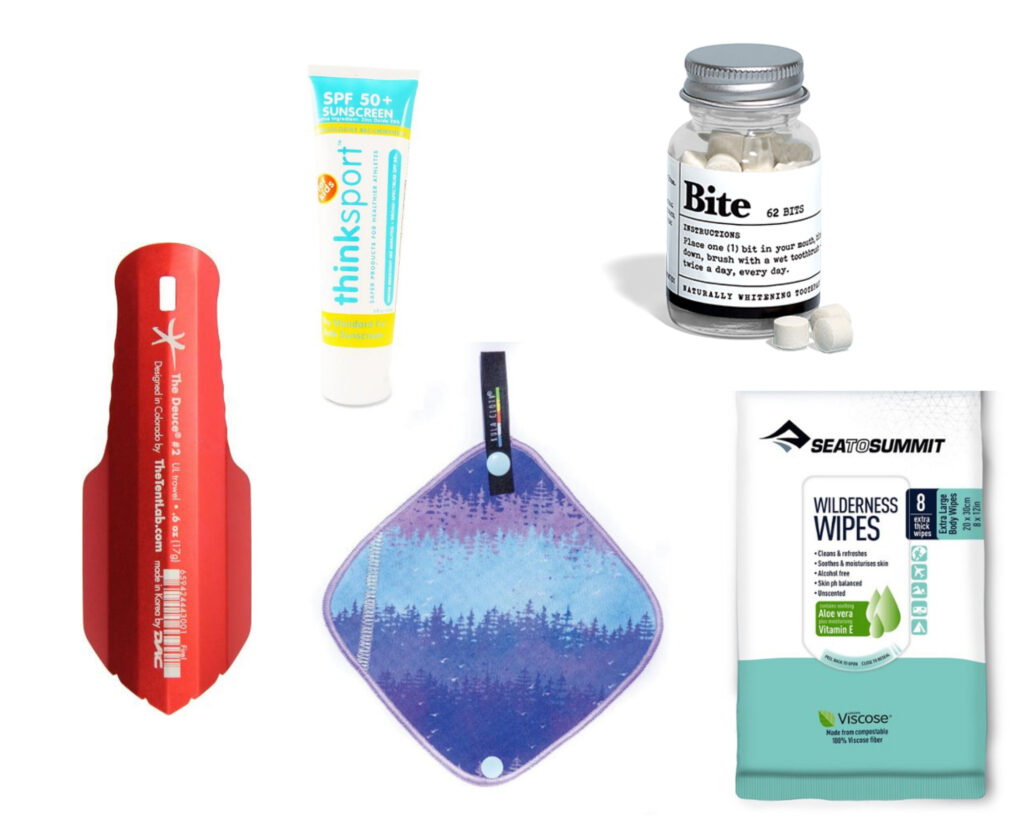
Small Towel with Biodegradable Soap
One of my spontaneous purchases at REI was this double sided towel for cleaning up. It has a rough side to get off stuck on foods and a soft side. It is a mainstay in our backpacking supply kit. I also poured some CampSuds in a tiny Nalgene reusable bottle for camp soap (Remember your Leave No Trace principles and do not clean dishes anywhere near water sources).
Food
Make sure to bring enough food for each day you will be backpacking. Try your backpacking meals out before you go to make sure you like them. If you don’t love it at home, you won’t love it on the trail, trust me. We like carb rich, creamy foods with plenty of indulgent snacks like Snickers, cookies, peanut M&Ms. Remember to bring a trail mix without chocolate pieces because those do melt! Our absolute favorite meals are these.
Backpacking Checklist for First Aid & Safety
 One area that you cannot skimp on in my opinion is first aid and safety. I find this especially true when hiking with kids. Plan for the worst, hope for the best is my motto in this area.
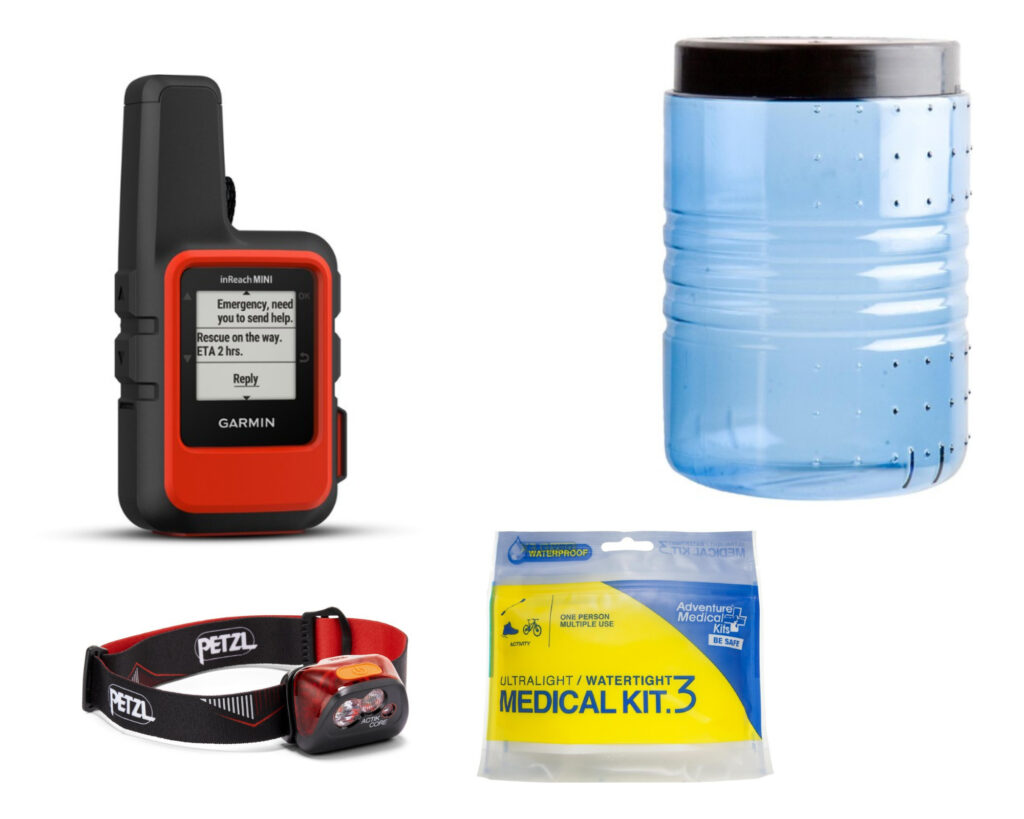
GPS Communication Device
This is one of the most expensive items on our backpacking packing list and one we actually borrowed from a friend for our first few trips and ended up buying one second hand. The Garmin In Reach Mini is a must have in my opinion while hiking in the backcountry where you do not have any service. We have had friends need rescuing from total accidents, so for us it is important to always have this on hand.
First Aid Kit
First aid is important to be prepared for on the trail. You never know what will happen. My son actually had a blister on the bottom of his foot before our trip even began, so we were happy to have this lightweight waterproof set from REI which included moleskin. We also added in a few tabs of Benadryl, Rocktape and Sheeps wool just in case.
Headlamp / Lantern
If you are camping in summer, you may not actually need a headlamp, but I would always considering bringing one just in case. We love these rechargeable headlamps as you don’t need to bring extra batteries. While this one is a touch cheaper, we actually prefer this one.
Bear Canister
Depending on where you are backpacking, you might need a bear canister. There are essentially only two types on the market. One is a clear box that comes in several sizes, but most often you will see – a smaller box and a larger box. These are notoriously difficult to open for some people. I am one of those people. Therefore, my only option was to use this type of bear canister, which comes in only 1 massive size!
After a few trips with my heavy bear canister I switched to this carbon fiber one. I LOVE it. I used it for 15 days on the JMT and have used it for every trip since and it is still in great condition. I believe I have the Blazer. Even though the company did not think I could fit in a 7 day food supply for 2 I did pretty easily!
To open my Bearicade can, we both wear a small washer connected to a bracelet that opens it perfectly. The flathead end on the Swiss army knife and the long spoon also opened it easily.
If there is extra space in our bear canister we include all of our kitchen gear inside for extra space in the backpack.
Emergency Rain Gear
We always check the weather meticulously before setting out on our adventure, but as you know the weather in the backcountry is unpredictable. During short adventures with no expectation of rain, we usually leave our rain gear at home. However when hiking the JMT, we had to have it (and needed it!)
I have lightweight rain pants that I purchased from a random store in Mammoth, but I used this rain jacket which worked out quite well. It doesn’t look amazing, but hey, its to keep dry!
Also, make sure you backpack has a rain cover included or buy one to keep with you. This is your entire life on your back at the moment, so it is best to keep it dry.
Duct Tape
As I mention in my post on Backpacking Hacks and Tips, duct tape is an essential backpacking item to have with you. Our recommendation is to wrap a bit around your trekking poles or some other bottle that you will be bringing with you. I put it around a small pencil that my son brings with him.
Essential Backpacking Clothes
 The clothes you bring is very personal on what is comfortable to you. I will list what we took with us, the positives and negatives and then it’s up to you to figure out what will work for you and the climate where you will be backpacking. But there are a few essentials we highly recommend. I will say that the more wool items you can manage, the better off you will be in the scent department as well as warmth and comfort. Cotton does not dry as quickly and retains smells and is much heavier. Opt for quick dry synthetic fabrics or merino wool when possible.
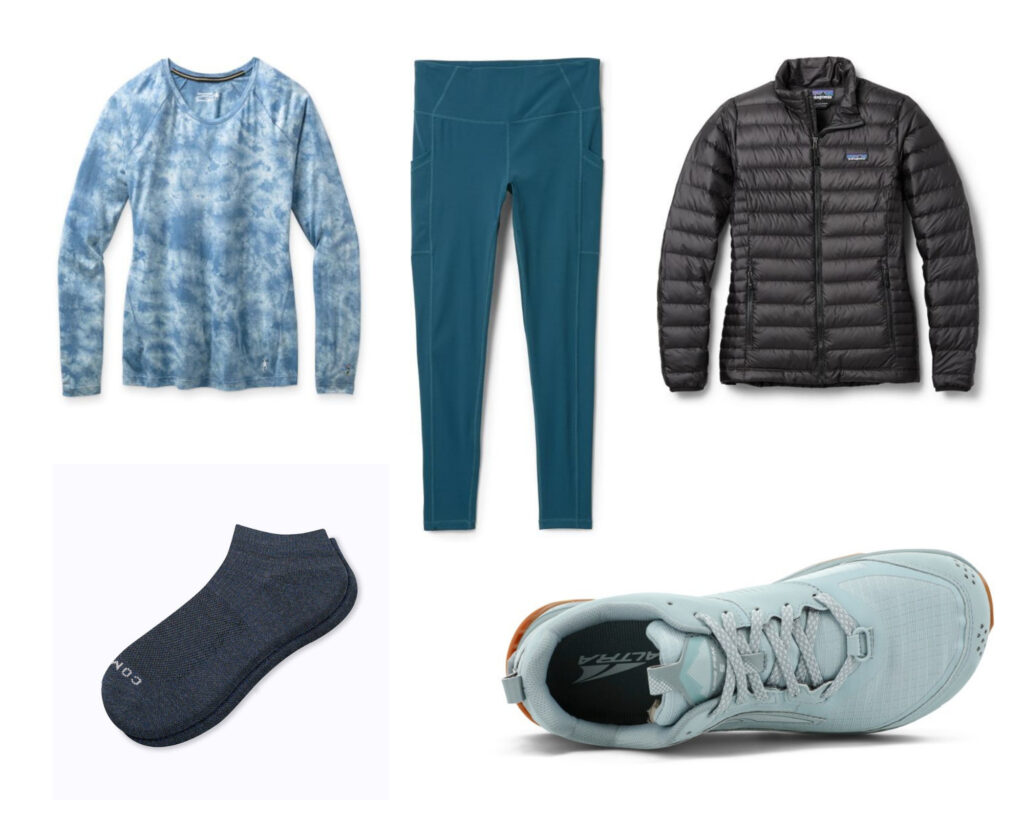
Hiking Shoes
For many backpackers, the rugged ankle boots are the way to go. I on the other hand believe in lighter is better and many JMT/PCT thru hikers agree with me. I wear and love my Altra Lone Peak trail runners. They do have higher top shoes as well if you need ankle support. These are lightweight, allow your feet room to spread out which helps with balance and swelling. I have nothing but love for these shoes.
My son wears Merrell high top hiking boots. He has worn these boots since he was 4 increasing in size each year obviously.
The most important factor is comfort and support. Your hiking boots should not cause blisters. If they do, you might need to evaluate them and/or your socks.
 Wool Socks
My favorite thing in the world these days is wool and this goes for my socks as well. My son wears either Smartwool or Darn Tough wool socks. I have both Smartwool and a local LA brand Comrad. I prefer my Comrad compression wool ankle socks the most because I typically hike in a dress and don’t like having socks up my legs, but they have been out of stock for ages. I have been trying these out in their place which seem to work decently well.
Whatever you like, but just make sure you get wool socks. They will absorb moisture to help prevent blisters. Wool is also antibacterial which reduces stink. I brought 2 pairs for myself and washed one pair at night to switch out. My son brought 3 pairs.
Wool Base Layer Long Sleeves
I love wool. I will say it again. The only long sleeve item I had with me was my long sleeve lightweight base layer from Smartwool. It is super comfortable so that I can wear it even in the heat of the day to keep the sun off my arms. It keeps me warm in the morning chill and doesn’t rub when I wear it with my backpack on. Highly recommend having a merino wool long sleeve base layer in your backpacking packing list arsenal. My 12 year old had his wool base layers that also acted as PJs.
These days I much prefer my ultra light wool hoodie that keeps my arms covered in the heat of the day, but can also be worn as a long sleeve layer.
Down Puffy Jacket
Everyone needs a down puffy jacket. I have a Patagonia jacket that I bought 5 years ago when we went to Alaska that is still going strong. Yes, these jackets are expensive, but they are so worth it. For children, you can consider the REI brand down puffy jacket or even this one from Shred Dog which is even more economical, but provides the same power, strength and comfort in a lightweight package.
Hiking Pants
Hiking pants for me means leggings. I love my Prana leggings, but found they were a little too heavy for much of our backpacking since it’s quite warm in the day. Instead, I opt for wool of course! I LOVE these bike shorts that I wear under my Wool& dress. I also always bring one long pant. Depending on the weather I might bring these lightweight leggings or these thicker leggings if it’s going to be cold or I’m only using them at night and in the morning.
My son wore a pair of long pants and brought a pair as extra. In the future we may cut out the second pair and opt for shorts depending on the weather forecasts.
Clean Underwear
Ladies, just bring the clean underwear for each day you are on the trail. You will be much happier putting on clean undies every day, trust me. This is the best way to feel fresh and clean without a shower. This is a must for my backpacking packing list! My go to are these wool undies.
Sports Bra
Wool is the way to go here too! I typically just take one and it is great at the end still. This one is great.
Camp Shoes (Optional, but useful)
One item that might be included under luxury and comfort items is a pair of camp shoes. I disagree and feel it is a must have item. Your feet need to breathe and get a rest when you are at camp. After lots of trial and error using super lightweight backpacking type sandals, I have ended up loving my Birkenstocks.
Clothes for Cool Weather
If you are camping during spring or fall, your backpacking packing list might need to include items for colder weather. We did not need any items for colder weather even though we were high in the mountains. If you do, considering bringing thermals to sleep in, a beanie and gloves.
We did bring with us 2 buffs that were great to cover our heads during sunny moments, cover our necks and to get wet and wrap around our necks when we were hot.
Backcountry Toiletries
 Even though you will be without a shower and smelling pretty, you can’t skimp on a few backcountry toiletries that we share below.
Poop Shovel
Yep, you read that correctly, you will need a poop shovel on your backpacking packing list. We love this super light weight, but very sturdy shovel. In addition to this, you will also need toilet paper and a ziplock bag to carry out your dirty paper. Yep. It’s not as bad as it sounds to be honest. As my friend calls it, poo with a view.
Pee Rag
My favorite hiking accessory these days is my Kula Cloth pee rag. This thing is really great and really helps reduce any extra smells that can build up from drip drying. Use this for pee only.
Zip Lock Bags
As much as I hate to use zip lock bags, these were our best friend during backpacking. From food waste to trash, we used them all the time. Bring the light weight sandwich bags for dry waste and a the freezer quart size to pour hot water into while cooking.
Hand Sanitizer
While this isn’t a necessity on a backpacking packing list, I highly recommend bringing a small tube of hand sanitizer that was useful for quick uses after going to the bathroom. You don’t need a ton though, so don’t worry about a big bottle.
Sunscreen
Sunscreen and sun protection (aka hats) are a must for all summer backpacking packing lists. We took a small tub of stick sunscreen, but next time I will take a liquid version instead even though it may not hold as much. I found that I was less likely to put the stick on my arms and legs, which did get quite a bit of sun. Bring what works best for you.
Body Wipes
For most backpacking packing lists, it is recommended to take baby wipes. I decided to try the Sea to Summit Large Body wipes, and I was very happy with these as they are scent free (meaning they didn’t have to go in my bear box, but I put them there anyway!) and are quite large. I could easily wipe my face and neck down, legs and feet with just one wipe. Remember you must pack out what you bring, so take an extra ziplock bag for the dirty wipes.
Chapstick / Lip Balm
The mountain air always makes my lips get chapped, so I made sure to bring along my favorite SPF chapstick. Love this stuff!
Toothbrush & Toothpaste
For many people, small tube of toothpaste is the best option for backpacking. However, we have something even better! Bites Toothpaste are tiny small round pill shaped bits that are actually toothpaste. They are great because they are small, totally dissolve and are better for the environment. Pack your Bites in a small button sized bag and you are good to go. For ultra lightweight toothbrushes, consider getting bamboo brushes.
Small Hairbrush
A small hairbrush is not a necessity at all for most backpacking packing lists, but since both my son and I have long tangle prone hair, we decided at the last minute to bring our tiny hairbrush. I am so happy we did as well. It felt nice to be able to brush my hair that was super sweaty and tangled up from being in a hat. This is up to you though.. bring it or not.
Optional Backpacking Gear List
 The next few items are considered optional for some people and mandatory for others. We take all of the items below with us, even if they are a bit heavy.
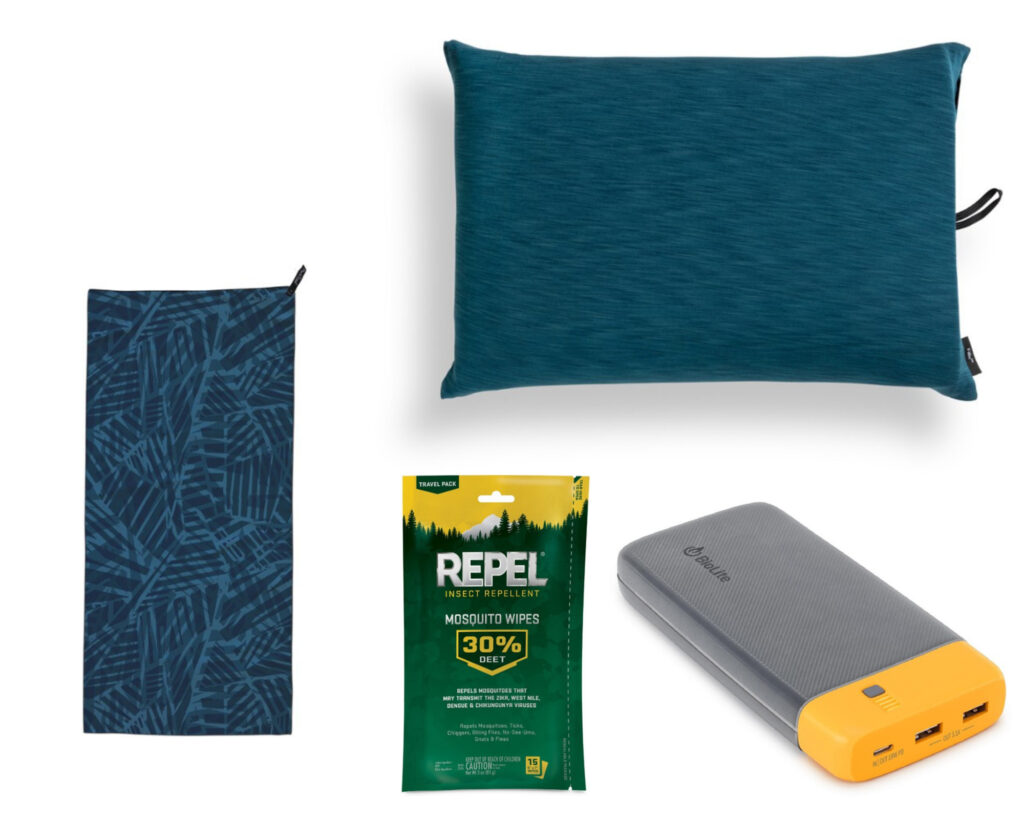
Insect Repellent &/or Bug Spray Wipes
Depending on where you are going and what season, you may need to bring bug spray and/or wipes. I brought my favorite Doterra Bug Spray oil as well as a few packets of Natrapel wipes. I like the wipes better than spray only because I can easily get under my clothes without worrying about staining.
Pro Tip: Spray all of your clothes with Permethrin before you head out on the trails to keep your clothes bug free.
Backpacking Pillow
For me, this is a must have on my personal backpacking packing list. I took this really lightweight blow up pillow which was wonderful to have and didn’t add much weight.
Small External Battery Pack
Over time I have upgraded my battery packs to these. I take two on most trips because they are small and light and hold a good charge. For shorter trips you probably only need one as most things will hold a good charge. For long hikes and backpacking trips, I love this solar panel that is super light and helps to refill my battery packs during the day as I hike.
Lightweight Quick Dry Towel
Not a necessity on your backpacking packing list, rather a good idea if you are planning to be around lakes or rivers, is a quick dry towel. We took two small ones, which I would probably take again. One we used for dishes and the other we used for our feet and to sit on by the lake.
Printed Out Permit
For most backcountry hikes in California you will need a permit. Make sure to print out your permit and your camping stove permit to carry with you along the route.
ID, Cash & Car Key
Depending on what you are doing, it might be important to also carry your ID, a bit of cash or a credit card and your car key. It is useful to have a few of your important items in case of an emergency. I did not take any cash because I knew we were doing an out and back trail, but for any thru hikes I think it’s important to have just in case you need to catch a bus or ride.
Before you go, don’t forget to download your FREE Backpacking Checklist!
Looking for even more information on camping & backpacking? Check out these articles on the site:
—- 20 Spots for Backpacking in California
—- Backpacking Hacks & Tips for Beginners
—- Backpacking Little Lakes Valley
—- Top 50+ Spots for Camping in Southern California
—- Our 10 Favorite Camping Meals
If You Enjoyed This Post, Sign Up To Receive Posts By Email or…
- Join us on Facebook for regular updates and related articles
- Check us out on Instagram to see what we are up to in photos
- Follow us on Twitter for links to great travel articles curated just for you
- Or share this post with others by pinning on Pinterest!
Was very usefull website