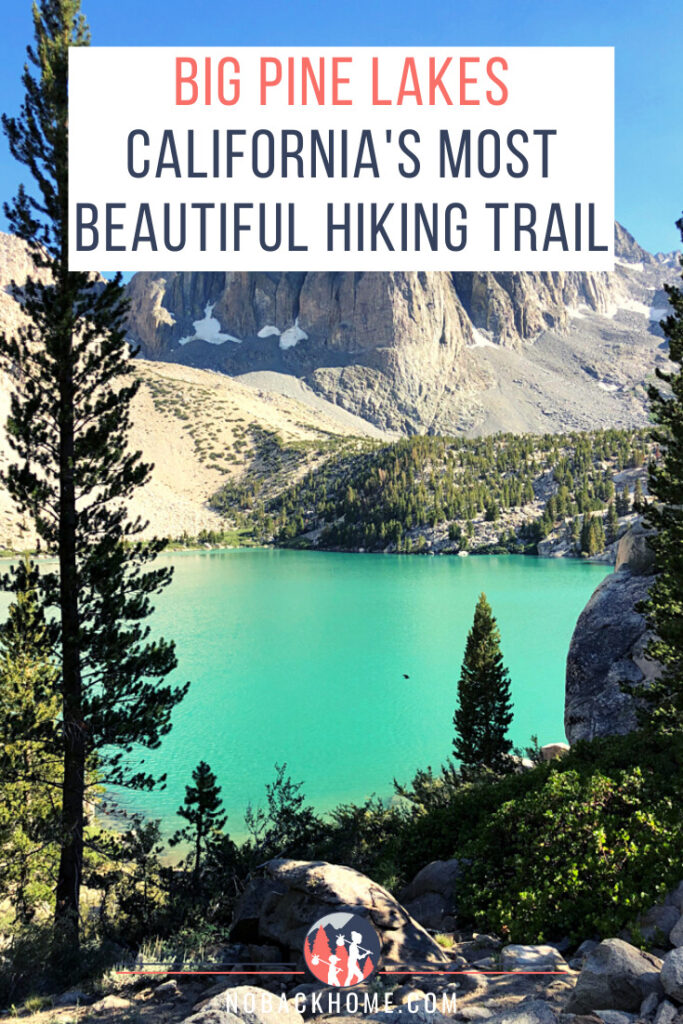
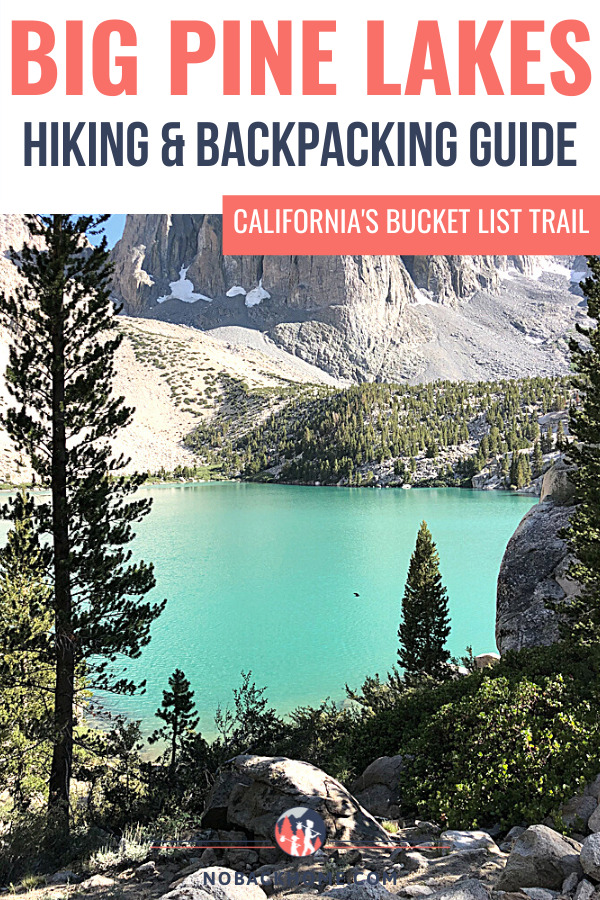
Big Pine Lakes Trail in California is one of the most beautiful hikes you can do in the United States. Whether you are day hiking or backpacking Big Pine Lakes, the view once you reach the glacial lakes will take your breath away. Located in the John Muir Wilderness, in the Eastern Sierra Nevadas, this is a strenuous day hike that takes you deep into the forest to picturesque turquoise lakes.
This hike is one of the biggest bucket list hikes in California that must be done if you are an avid hiker and outdoor adventurer. From the first time I saw photos of these glimmering turquoise lakes, reminiscent of Lake Louise in Canada’s famous national park, I knew I had to go. For years I had planned to only hike to the lakes as a day trip because I was not into backpacking, but as luck would have it, I became a backpacker! (Check out other amazing overnight backpacking trips in California.)
Below I’m going to share how you can hike to one of the most beautiful places in California. Everything you need to know on how to visit the lakes and some detailed information on the trail that takes you there. And trust me, the watercolor is truly that turquoise – photoshop is not needed here!
Disclosure: Some of the links in this post are affiliate links, meaning at no additional cost to you, I will earn a commission if you click through and make a purchase.
Jump to a Heading Below
Hiking & Backpacking Big Pine Lakes Trail
Below I go through the most frequently asked questions about hiking or backpacking the Big Pine Lakes Trail. In general though, the trail starts at around 7,600 feet of elevation. The trail to the first lake is around 4.8 miles with around 3000 feet of elevation gain. The route to the second lake only adds a bit more to your hike as it is very close.
Overall, this is not a difficult trail and it not overly steep, but it is a continual climb from the get go, with a few switchbacks along the way.
For those looking to do this as a day hike, plan to hike at least 10 miles, but closer to 11 miles depending how far up the trail you go.
Where is Big Pine Lakes in California?
Big Pine Lakes is located in the heart of the Eastern Sierras of California. It is roughly 10 miles west of the small town of Big Pine and around 15 miles south of Bishop. It’s also not too far from Mammoth, which makes it a good place to visit en route to Mammoth Lakes.
How Do I Get to Big Pine Lakes?
The Big Pine Creek North Fork Trail is rather remote. It is located at the end of Glacier Lodge Road. The only way to access this area is by car. Since it is quite remote, camping near the trailhead or staying nearby in Bishop the night before are great options. We camped which was perfect. If you need parking, you can either park at the base of the trail near Big Pine Creek Campground or if it is full, you will need to park in the overnight parking lot a bit further away.
What is the Best Time of Year to Hike to Big Pine Lakes?
The best time of year to hike Big Pine Lakes is in late (late) Spring after the snowmelt, summer or early fall before the first snow. Summer is the height of the season, even though it can be very hot and much of the trail is exposed with little shade.
Our recommendation is also to go mid-week if you can swing it as summer weekends do get very busy with day hikers coming in from nearby Bishop.
Do You Need a Permit to Hike Big Pine Lakes?
If you plan to do the Big Pine Lakes trail as a day hike, you do NOT need a permit. Permits are only required if you plan to camp overnight at the lakes. Permits are quite limited and do require a reservation. You can reserve a wilderness permit here.
For more information on tips to backpacking, check out our 21 Practical tips for Backpacking.
How Long is The Hike to Big Pine Lakes?
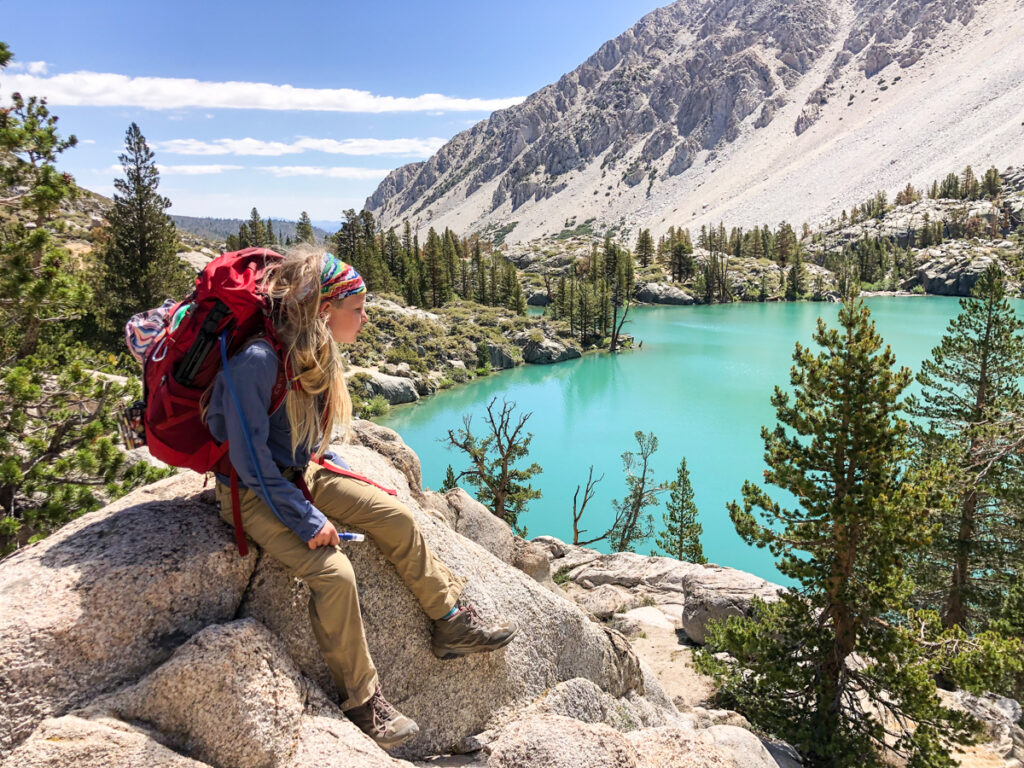
The hike along the North Fork of Big Pine Lakes in total is around 15+ miles going back to the furthest lakes, however most visitors only make it to the first lake, second lake and third lake, which are right next to one another. Depending on your speed, acclimation to the altitude and fitness level, hiking to lake 1 can take anywhere from 3.5 hours to 4.5 hours. With our packs, and stopping for many breaks, it took us about 4 hours to reach lake 1 and 4.5 hours to reach lake 2.
What is the Elevation Change at Big Pine Lakes?
The starting elevation of the the Big Pine Lakes trail is at around 7,600 feet. The elevation gain to the lakes is around 3,400 feet (at around lake 3). If you continue on to the Palisade Glacier past the Sam Mack Meadow, it is 4,400 feet approximately.
Big Pine Lakes Trail Tips & Information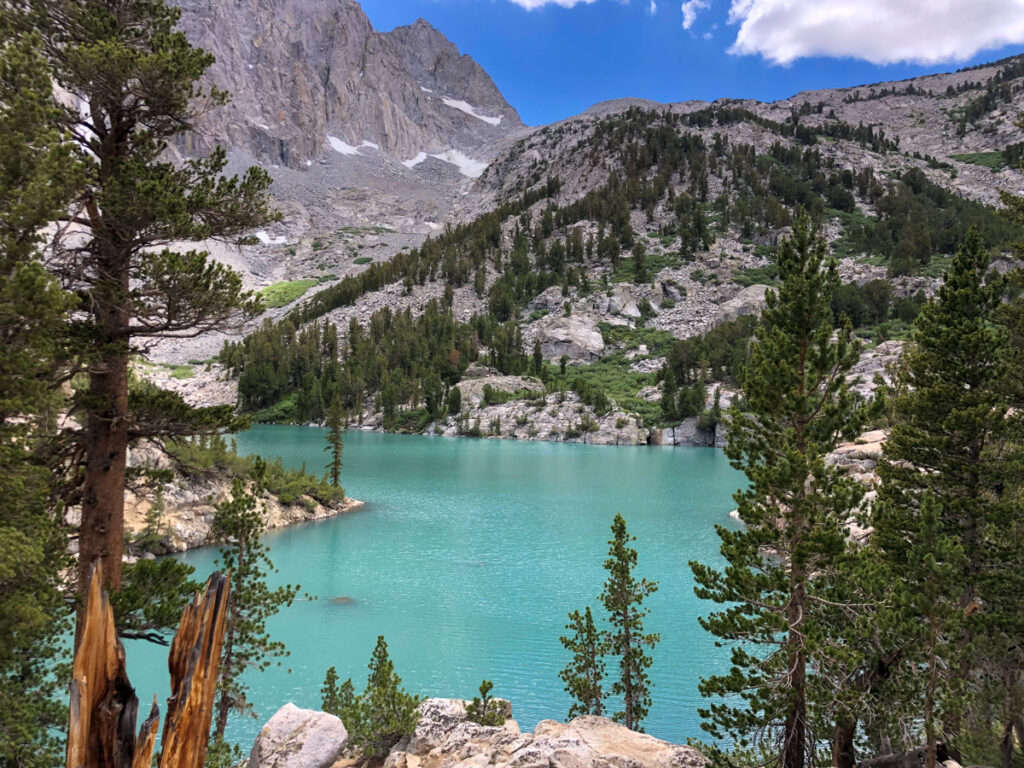
- Bring a water filter to replenish you water even if you are only doing a day hike. There is no clean water available otherwise.
- Note, there is a vault toilet at the trailhead, but none after that point. Bring supplies & remember to pack out.
- The trail is hot during the summer, so plan to go early or later and have plenty of sun protection.
- If the day use parking lot is full, plan to add another .6 miles to your journey each way.
- The trail is clearly marked, but I do recommend having it saved offline on All Trails Pro if possible.
Managing the Altitude
The Big Pine Lakes trailhead starts at around 7,600 feet in altitude, going up to around 10,500 at Lake 3. For the Eastern Sierras this isn’t the highest altitude you can find, but it is a decent altitude which can be troublesome for some people. Altitude sickness does not affect everyone the same way. For many people they may only notice a bit of breathlessness when walking and hiking, for others it’s a real issue that can be debilitating. As you go higher in elevation, there is less oxygen to breathe in which impacts how your body feels.
What exactly are the symptoms of altitude sickness?
The symptoms of altitude sickness can range from mild to severe headaches, nausea, shortness of breath, fatigue and difficulty sleeping.
For most people, symptoms of altitude sickness can begin within a few hours of getting to higher elevation. However, we have seen it happen several times that it takes a little longer to really notice or that the symptoms come and go.
While hiking in Ecuador I didn’t have any issues at high altitude until 2 days into our trek (going down in altitude even) when I began to feel nauseous. For my son, who rarely notices the altitude, he has occasionally felt extreme fatigue out of nowhere on hikes around 10,000 feet even after days in a similar altitude. As soon as we come back down on the hike, energy levels increased and he felt back to normal.
How to Prepare & Feel Your Best
In our experience, the best thing to do to prepare to go into higher altitudes is to hydrate very well. We typically drink electrolyte drinks for the 24 hours prior to visiting higher elevations. If possible continue to drink at least one electrolyte drink per day while in high altitude as well to help keep any symptoms away. These are our favorite powder packets to add to our water.
Additionally, avoid alcohol, drink a ton of water (3-4 liters a day), eat more carbs and go up in elevation slowly. If you experience symptoms that are not reducing with water, electrolytes or pain reliever medication, get down to lower elevations.
Where to Stay: Big Pine Lakes Camping
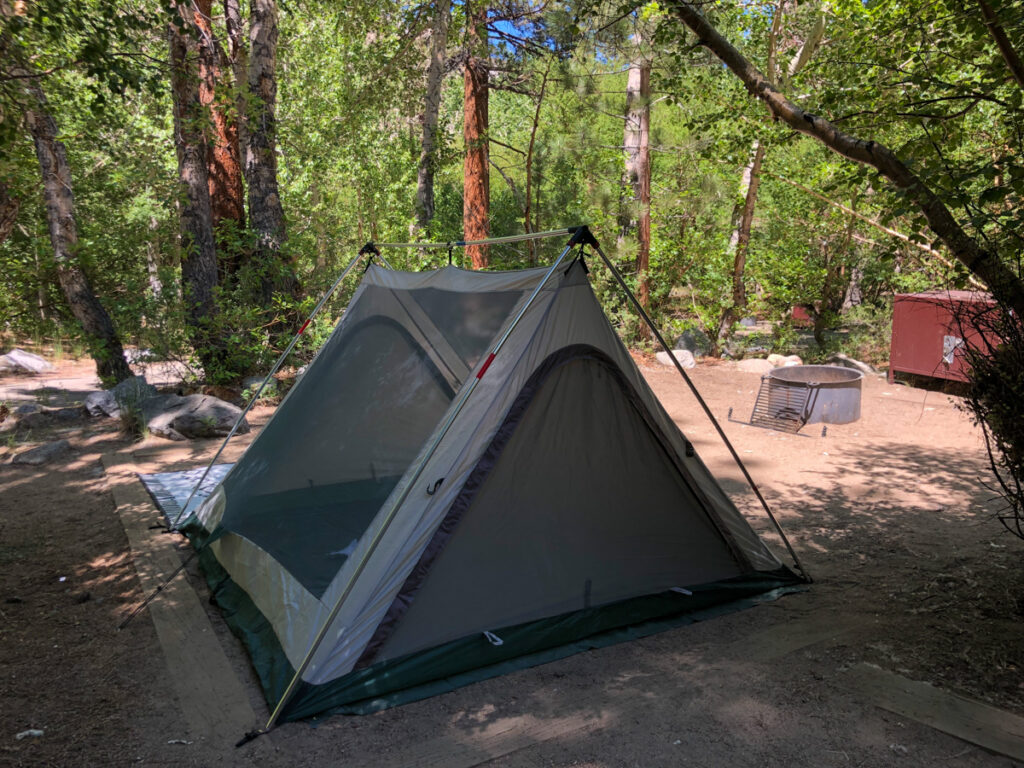 Regardless of whether you plan to day hike or backpack the Big Pine Lakes trail, you will need a place to stay that is close by. There are several options for camping right at the trailhead that make the trip much more enjoyable as it is a bit of a drive from the nearest town of Bishop, but many people do this from there. If you do stay in Bishop, plan to get a very early start as the parking lot fills up by 7 a.m. in the summer.
Big Pine Creek Campground
Our top recommendation for where to stay is Big Pine Creek Campground. This small 30 site campground is nestled along the Big Pine Creek offering a respite from the hot summer sun. The campground is small, as are the sites, so if you are with a group I would consider getting several sites next to one another. This campground is the closest campground to the trailhead, making it the most convenient for day hikers as well as backpackers.
Upper Sage Flat Campground
The next closest campground for the trailhead is the Upper Sage Flat Campground. While this is not my first recommendation, if you just need a place to stay before heading off backpacking, this will be fine. The campground is not as shaded as Big Pine Creek, but offers many sites and more space for groups. This campground is closer to the overnight backpackers parking area than the main trailhead, so you might considering driving to the trailhead if you are not sure how much stamina you will have for the hike.
Sage Flat Campground
Just a touch further from Upper Sage Flat is Sage Flat Campground. This would be my second choice campground if Big Pine Creek is full. This campground is partially shaded and has nice sites along the river. Again, the sites are not always huge, so if you have a group, plan to book 2 sites next to one another.
Glacier Lodge
Glacier Lodge is a strange little place thrown into the mix here. It is privately owned, but located just outside the gates of the trailhead and at the end of the road by the Big Pine Creek Campground. This lodge offers drive in spots (not scenic, but does the job) for RVs or tent camping. They also have small rustic cabins for rent as well as package promotions with pack mules and supplies to head up to the lakes. Kids will love the not free trout pond to fish. Supplies can be purchased/rented from the small shop here.
Big Pine Lakes Trail Report
July 2023 Update: The trail leading up to Lake 2 is mostly clear of snow, however accessing the trail past this point still has considerable amounts of snow. It is recommended you have hiking poles and some sort of traction for your shoes (crampons or microspikes). Additionally, much of the trail is quite muddy with some sections up to ankle deep with water and mud. Bring extra socks even for day hikes.
 Depending on where you begin your hike at either the main trailhead or the overnight hikers parking lot, the beginning of the trail will be a bit different.
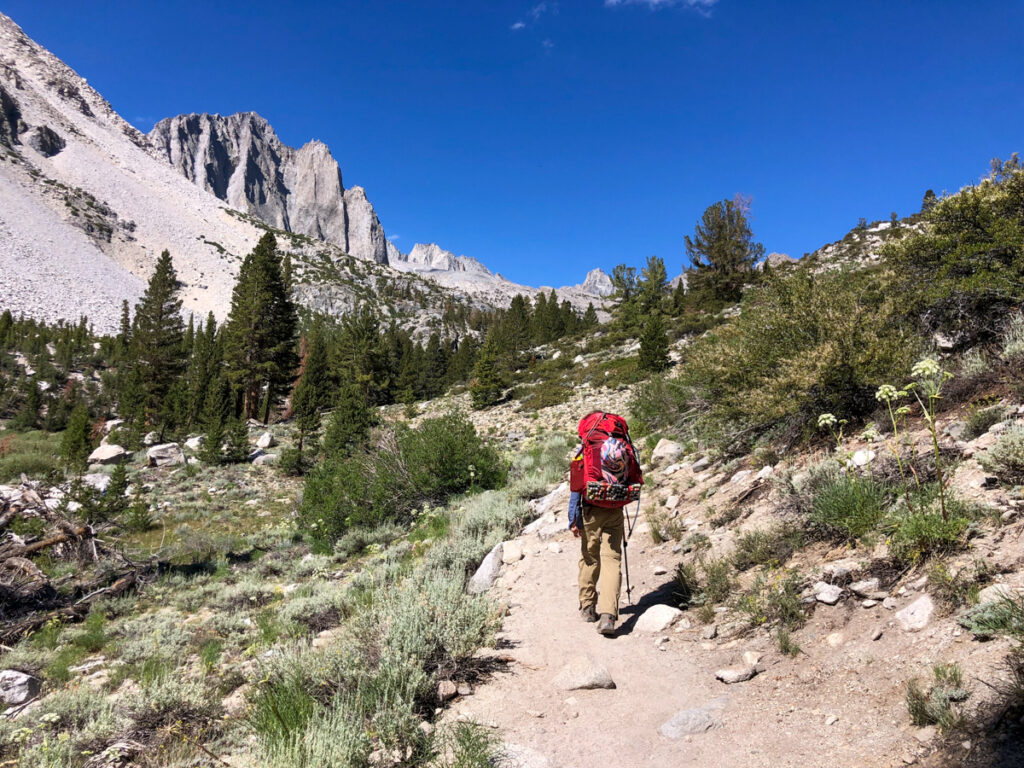
For us, we began our hike at the overnight hikers parking lot at 6:30 a.m. The sun was already well up in the sky, beaming down on us. The first 2 miles of the trail is unrelenting. Straight up hill with zero shade. I would say that looking back this was the toughest part of the trail both going up and coming back down, mostly due to the sun exposure and little breeze.
As you make your way up the trail, you will go up a few rocky switchbacks that lead you to the infamous John Muir Wilderness sign that everyone stops to take a photo with. Here you will also pass by waterfall #1. This is a nice spot to have a quick break, catch your breath and cool down if it is hot already.
Lon Chaney’s Cabin
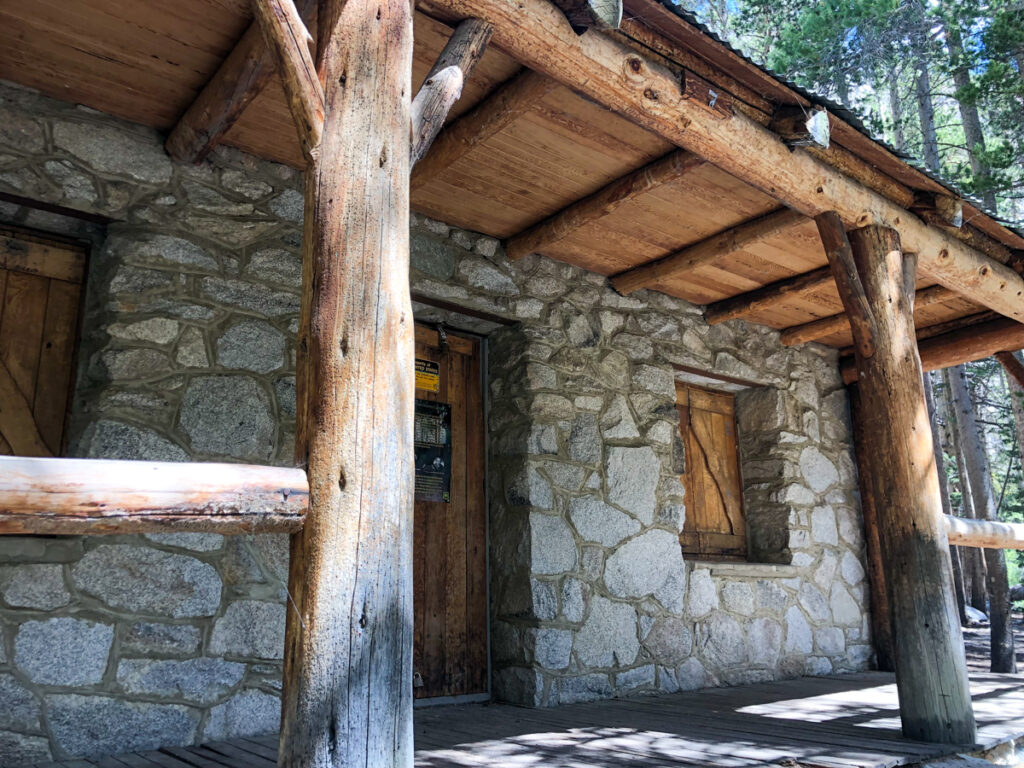
The next bit of the trail is not as steep, offering a bit of respite for your legs and lungs. You will soon come upon the Wilderness Rangers Camp or Forest Service Cabin which is also known as Lon Chaney’s Cabin. This is the halfway point and a great place to take off your packs if you are backpacking, put your feet in the water and have a good rest.
From this point on, the trail meanders through manzanita fields, through lush forests with wildflowers lining path in early summer and across a few streams. There is one more set of switchbacks with no shade before you approach the first lake.
Reaching the Lakes
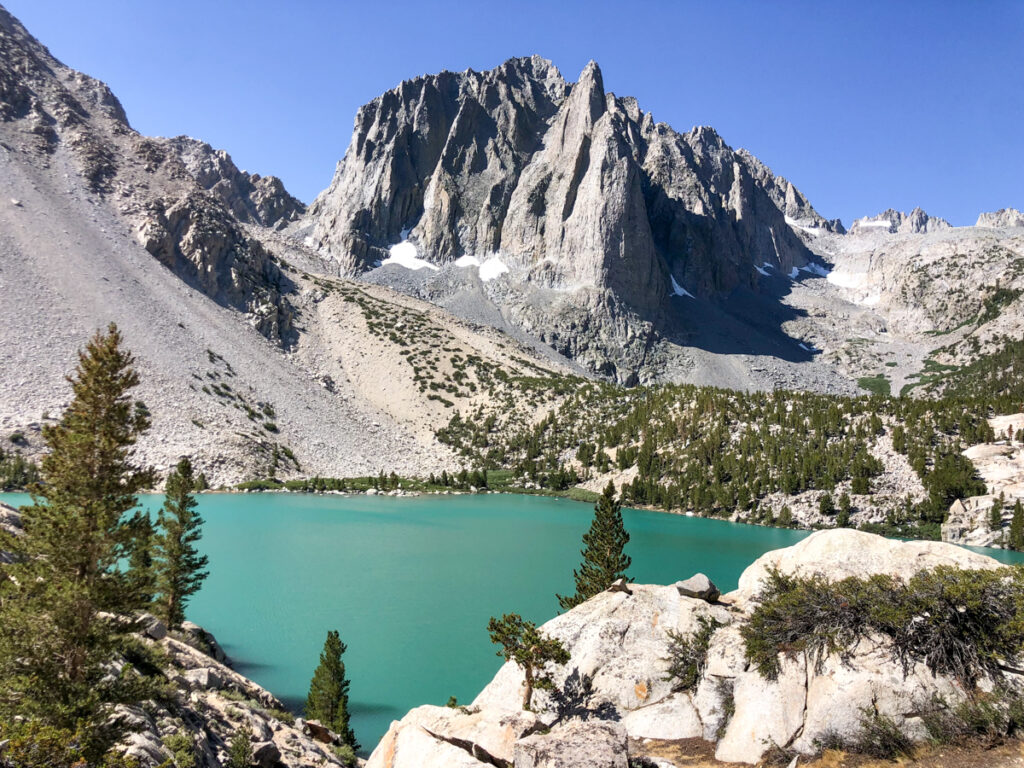
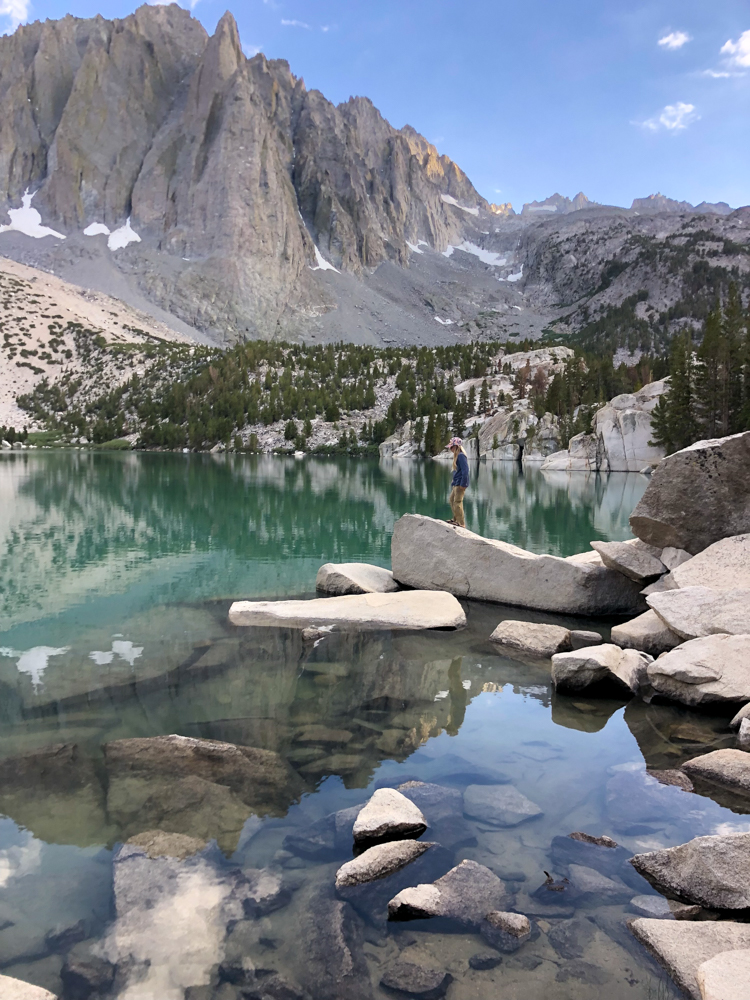
Here you can ooh and ahh at the beauty before making your way down to the shore or you can continue on to Lake Two. Our recommendation is to continue on to Lake Two. There is a beautiful “beach” at this lake with Temple Crag as the backdrop that is a favorite for Instagram photos and jumping in the water to cool off.
For the adventurous, you can continue on to lake three, which is not much further than lake two. To be honest, if you are tired, I wouldn’t continue on further. The fourth Lake is not turquoise and is more of a pond color, while the fifth lake is a beautiful blue color it’s still not quite as spectacular as Lakes 1-3.
We did not make it to Black Lake, the Sixth Lake or the Seventh Lake during our visit, but look to explore them next time.
Beyond the Lakes
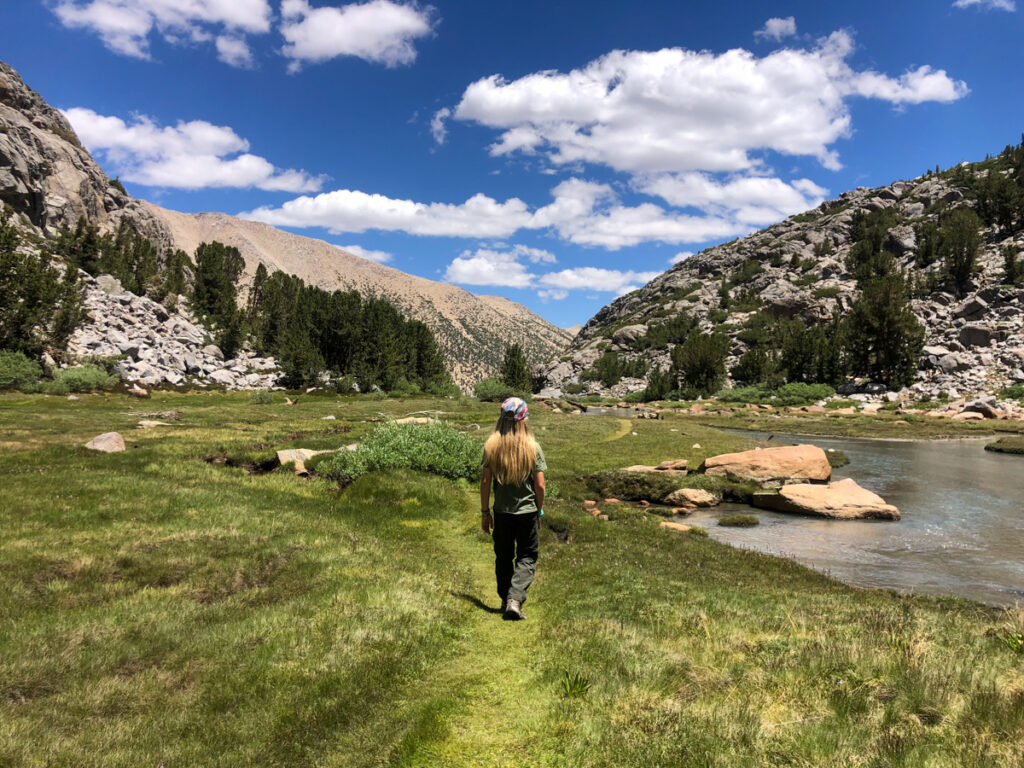
For those of you who have extra stamina and/or are backpacking, we highly recommend making your way to the Sam Mack Meadow on the trail to the glacier. This beautiful meadow makes you feel like you have been transported to Switzerland. A icy blue river runs through verdant green fields dotted with little ponds teeming with fish and frogs. It’s an absolutely peaceful place to explore and/or camp. The trail is mostly up, through rocky boulder areas, but with a clearly defined path. The mosquito can be relentless, so bring spray as well as water filtration to fill up your bottles.
We did not continue on to the Palisade Glacier as the river was a bit too full for us to cross. What we heard is that after the initial ascent, the path is non-existent and it consists of following cairns and climbing up boulders along the way. If you go, let us know how it is!
Obtaining your Big Pine Lakes Trail Permit
If you are interested in backcountry camping at Big Pine Lakes, you will need to obtain a permit for overnight use. These can be hard to come by with most of the permits allotted 6 months in advance. For those who are not that into planning, you have the opportunity for walk up permits 2 weeks prior to the hike.
Note, permits are also issued for the South Fork trail, but this is not for Big Pine Lakes.
In 2023, walk up permits are still being issued online through the recreation.gov website. One week before your permit is valid you will be able to print the actual permit – which is required when backpacking. Also note that the person listed on the permit MUST be with you during your trip.
Where to Set Up for Backcountry Camping
 For those of you lucky enough to have received a permit for backcountry camping, there are a multitude of options on where to set up your tent. Some hikers seem to know exactly where to go and continue past Lakes 1-2, while some are more tired and look to set up at the earliest spot possible. We stayed at Lake 2, but there are some great spots around Lake 3 which would offer a bit more privacy since not so many day hikers make it that far.
Things to Consider for Setting Up Camp
— You cannot set up your camp closer than 300 feet to the water.
— You will want to be close enough to the water for easy filtration for cooking/cleaning.
— Ideally you want to look for flat spots that have been used previously, which is evident by lack of rocks/brush.
— Many people set up on the rock cliffs overlooking the water which offer spectacular views morning and night. It can get windy though, so make sure to secure your tent somehow so that it doesn’t fly away during the day!
— Remember to store your bear canister at least 100 feet away from your campsite & to keep ALL of your scented items in the box at all times as the chipmunks are notorious for getting into things quickly!
Big Pine Lakes Trail Weather
The weather at Big Pine Lakes is variable much like other locations in the Eastern Sierra Nevada mountain range. The day time temperatures can get quite warm. During our last day, it was 93 degrees as we hiked down, which is very hot when there is no shade or breeze. In the spring and fall, however temperatures can dip down quite a bit with the lakes even partially freezing by Oct. The best bet is to continually check the weather before your trip and to prepare for both hot, cold and rainy weather.
Big Pine Lakes Swimming
Only the bravest who can manage the icy cold temperatures of the lakes will find it enjoyable to actually swim in the Big Pine Lakes. Most people tend to dip in and out quickly. The water is very cold and can cause hypothermia quickly so be cautious going too far into the water even though you may be hot and the blue water feels refreshing.
Big Pine Lakes Fishing
We did not fish officially during our visit, but we saw many people heading up and down the mountain with their fishing poles. Like all places in the Eastern Sierras, you need a sport fishing license to legally fish if you are over the age of 16. You can get your fishing license here. Children below the age of 16 are not required to have a license, but the adults in the group should secure one before heading out.
What to Bring for a Day Hike
In general our recommendations for a day hike on the Big Pine Lakes trail include:
- Water and water filtration to replenish your supplies (We use this type of filtration)
- Snacks, food things to keep your energy up
- Hiking poles
- Good traction hiking shoes ( I love my Altra Lone Peak)
- Moisture wicking clothes (wool and more wool!)
- Sun protection / sunscreen / hat
What to Bring for Backpacking Overnight
I won’t go through everything here that you should bring for an overnight backpacking trip on the Big Pine Lakes trail as I have an entire post dedicated to packing for backpacking. The most important things are obvious like a sleeping structure, tent/hammock, whatever you prefer, water filtration, food and of course a bear canister. Bear canisters are required here.
Enjoy your hike or backpacking adventure along one of the most beautiful section of California with the looming Sierra Crest above you. The Big Pine Lakes trail will be one that you won’t soon forget.
If You Enjoyed This Post, Sign Up To Receive Posts By Email or…
- Join us on Facebook for regular updates and related articles
- Check us out on Instagram to see what we are up to in photos
- Follow us on Twitter for links to great travel articles curated just for you
- Or share this post with others by pinning on Pinterest!
Awesome information!
Thanks for helping us plan our trip.
I hope you have a great trip! We are heading back out there soon ourselves! Can’t wait.
Great post. Do you know if you can camp the night before at the backpackers trailhead parking lot? All other campgrounds are booked up for our trip in late September.
Hi. Sorry I only saw this now. But yes, you can camp at the trailhead campground the night before you permit for the train begins.
Appreciate the info! Will be heading out for a solo trip in a couple of day. This was super helpful!