More than 1,500 people attempt to walk the entire John Muir Trail every year. A bit more than half of them succeed in a good year, with less than a third making it through in a year with natural challenges – high snow, monsoonal rains or wildfires. This guide from a JMT thru-hiker provides key information to help you tackle and complete the 211+ mile trek from Yosemite Valley to the top of Mt Whitney.
The John Muir Trail is not the longest thru hiking trail, but being dubbed as “America’s most famous trail” makes it one of the more popular thru hiking routes available. With sprawling meadows, soaring mountain peaks and pristine lakes, many believe this is one of the most beautiful thru-hikes in the US and just like it’s namesake, the grandfather of them all. The JMT has an almost magnetic pull on hikers from around the globe. From families with young children to retirees who have dreamed of this trail for decades, the JMT lures people of all ages to experience the spectacular beauty of the Eastern Sierras.
The truth is, my 11 year old is the one who deserves credit for getting us into the JMT world.
On a visit to Devil’s Postpile National Monument outside of Mammoth, we took an early morning hike to Rainbow Falls. Along our route, which is part of the of the John Muir Trail and the Pacific Crest Trail, we began seeing backpackers expertly packing up their tents, filling their bear canisters and preparing for their day on the trail. Even though we didn’t have our packs on, we felt a sense of camaraderie as we had just recently completed our first big backpacking trip.
Heading back to the ranger station, we kept seeing more and more backpackers. Being the investigative “reporter” that I am, we chatted to everyone we passed including a dad and son doing a 6 day, 60 mile section of the JMT. Having only completed a 3 day backpacking trip of 20 miles total at Big Pine Lakes, this felt unimaginable, even more so when we learned about the entire 211 mile trek.
My son was in awe and suggested hopefully that maybe we can do some of the trail. I thought “Uh, not this summer, but maybe someday”. Two weeks later, we had our very first JMT permit in hand, ready to tackle the first stretch from Yosemite Valley to Tuolumne Meadows.
 While in no means expert thru-hikers, diligent research, chatting with backpackers everywhere we went and being an active member of every online John Muir Trail group, we managed to make that first section hike a roaring success. Two weeks after that, we returned for the next section – Lyell Canyon to Reds Meadow. That was it, we were hooked. Unfortunately the forests closed two days after our last section hike due to extreme fire danger. The season was cut short, but we were bound and determined that we would return the following summer to complete the entire trail.
This trail offers a unique blend of stunning wilderness, history and community that makes it addicting. To help others experience the unparalleled beauty that is the Sierra Nevadas, below is my key advice on how to get started and give yourself the best shot at fulfilling your dreams.
Jump to a Heading Below
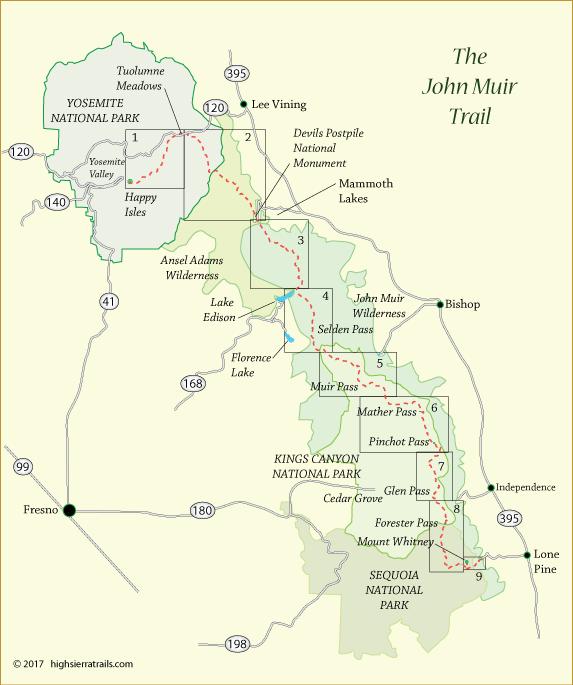
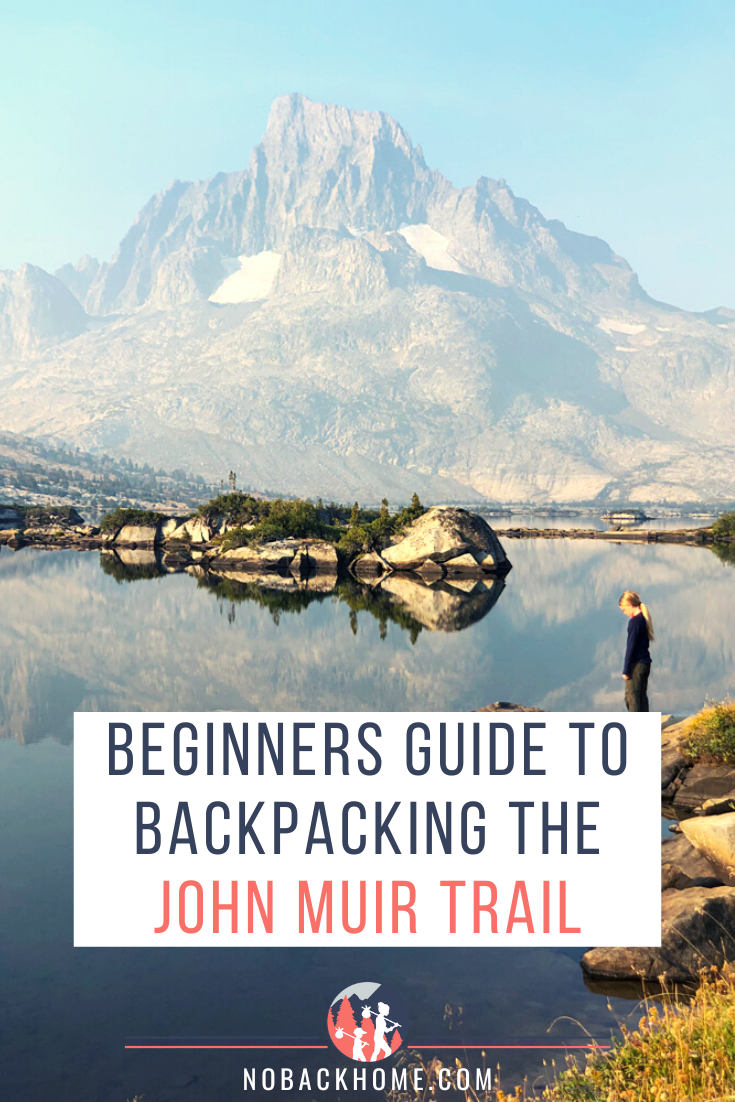
John Muir Trail Map & Overview
Length: 211+ miles
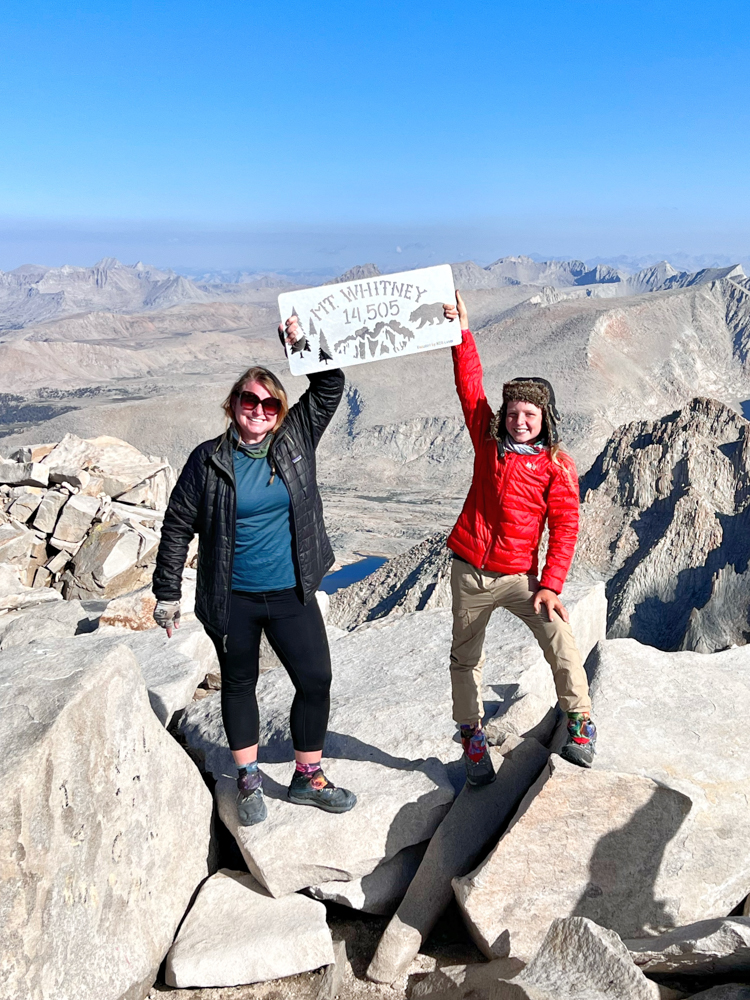
Highest Elevation: Mount Whitney, 14,508 ft (The highest peak in the contiguous United States)
Lowest Elevation: Happy Isles Trailhead in Yosemite Valley, 4,035 ft
Start and End Points:
- The summit of Mount Whitney is the Southern terminus, which is accessible via a 9-mile hike from the Whitney Portal trailhead
- Happy Isles Trailhead, in the Yosemite Valley of Yosemite National Park is the Northern terminus
The John Muir Trail (JMT) is around 211 miles long and takes 3 -4 weeks to complete for most people. The JMT shares 160 miles with the Pacific Crest Trail (made even more famous in Cheryl Strayed’s book Wild and how I first learned about thru hiking!)
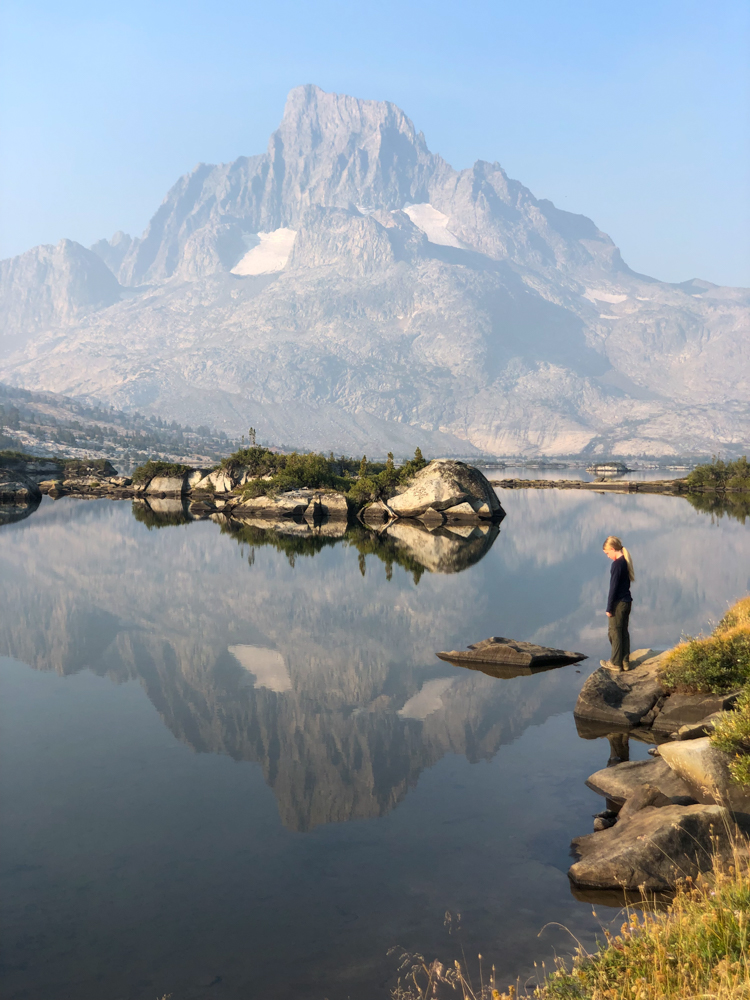
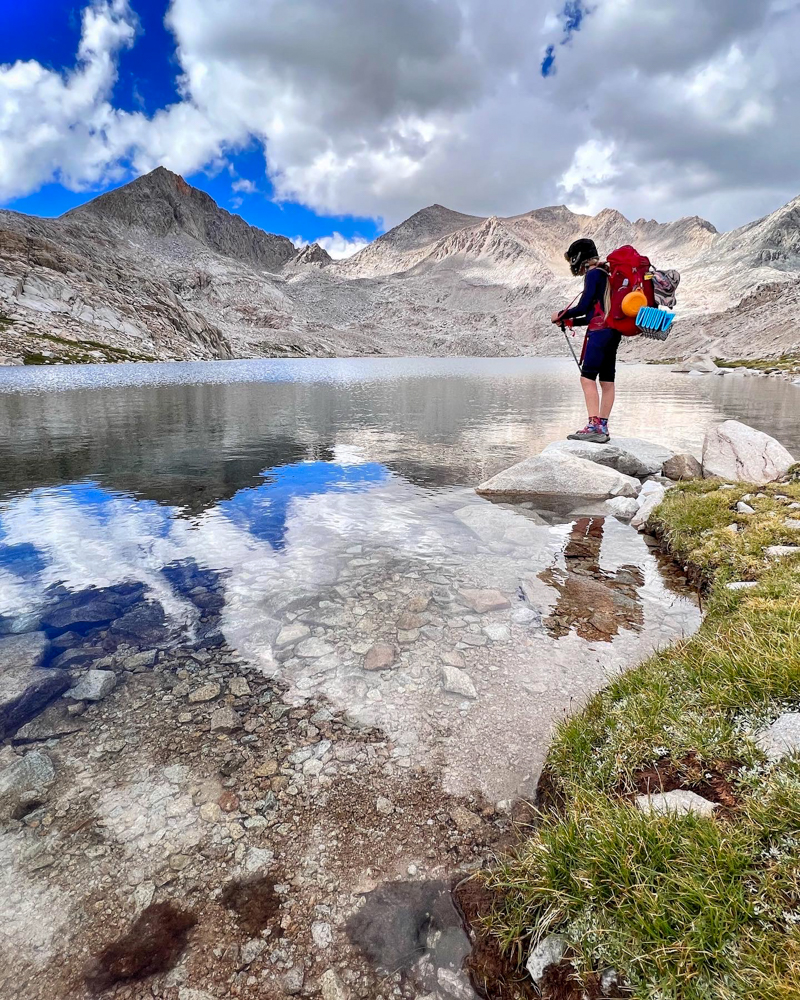
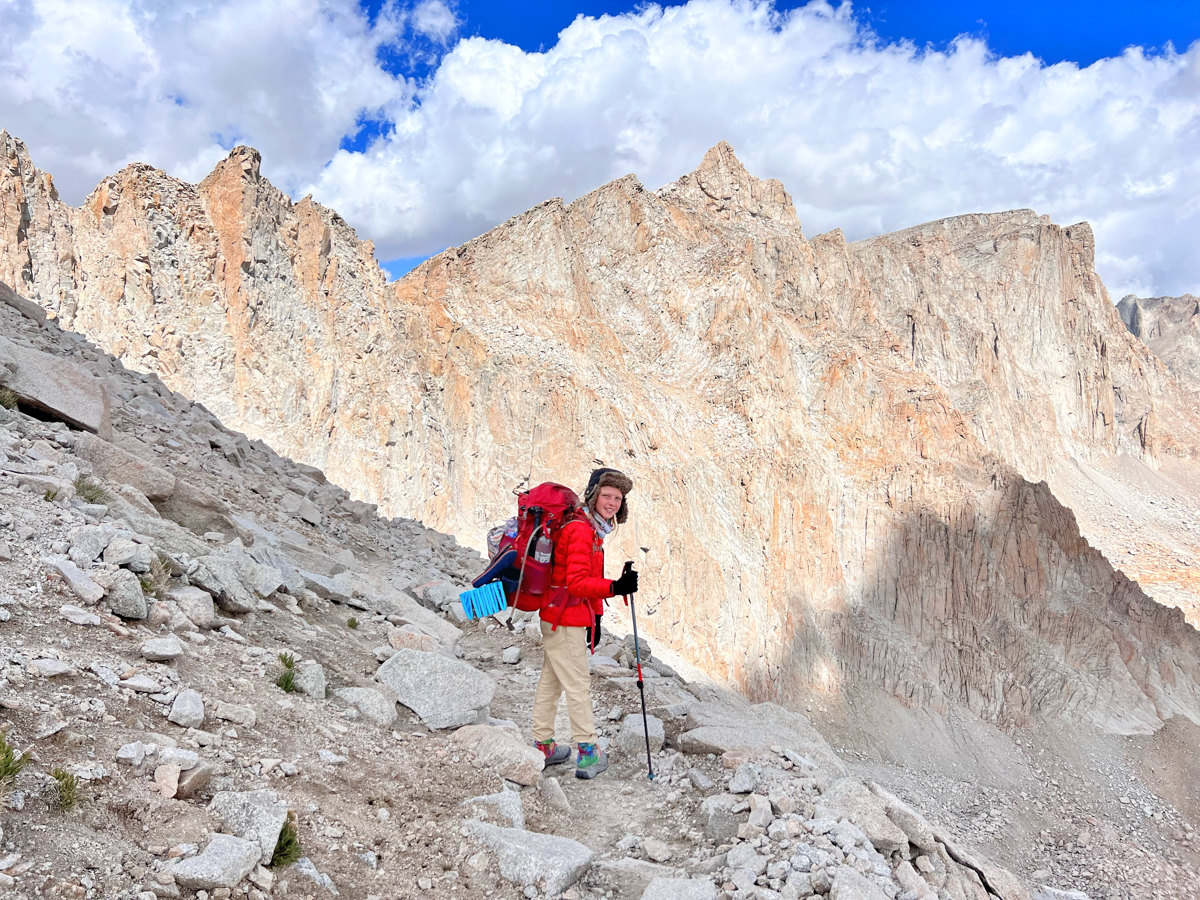
The JMT is an absolutely stunning trail providing unparalleled views of pristine alpine lakes, but is not all that easy to hike. Almost the entire trail stays above 8,000 feet, with the last 30 miles not going below 10,000. Additionally, hikers climb a cumulative 46,000 feet in elevation gain over the entire trail, and lose around 38,000 feet. The JMT’s difficulty comes from an uncompromising combination of high altitude, terrain, and natural obstacles, such as heat, high rivers, thunderstorms, snow and in recent years smoke from nearby wildfires.
In an effort to acknowledge the history of this land and that these series of trails were historically used for hunting and trade by indigenous groups, it is beginning to be known more and more as the Nüümü Poyo. This translates to “Paiute Trail” or “People’s Trail”.
The JMT thru-hike passes through 3 national parks – Yosemite, Kings Canyon and Sequoia National Park as well as Devil’s Postpile National Monument and the Ansel Adams and John Muir Wildernesses.
Which Way to Go & Where to Start
 On the JMT, you can go northbound or southbound. Traditionally, JMT hikers go southbound (SOBO), starting at Happy Isles in Yosemite Valley and ending at the summit of Mt. Whitney. This route allows you to gain elevation as you go, ending with your last 3o miles above 10,000 feet so that you are fully acclimated by the time you reach Mt Whitney. This route also allows you to carry less food at the beginning with several easy resupply points.
However as permits become increasingly difficult to obtain, more and more hikers are opting to go northbound (NOBO), starting further south of Mt Whitney at Horseshoe Meadows, Cottonwood Lakes or Cottonwood Pass. Permits are easier to come by in this direction, but the challenge is that you start at high elevation and summit Mt Whitney at the start of your trip.
Some hikers feel like they are stronger at the start of their trip, before the daily drag takes over, while others find that they are stronger after hiking for several weeks.
Having done it myself, I can see both points equally. The benefit of going NOBO is that you can leave the bulk of your belongings down below at Guitar Lake or even further at Crabtree Meadows making the ascent to Whitney much lighter. The negative is that you may not be fully acclimated to the altitude having only been on trail for a few days.
For many hikers, which way they go is merely determined by which wilderness permit they secure. For others, addicted to hiking in the Sierras, they just want to experience the beauty going both directions!
Attaining John Muir Trail Permits
One of the most challenging things about hiking the John Muir Trail is securing a permit for the hike. This highly competitive process sees more than 70% of permit applications denied and disappointed. To improve your prospects of getting permits, you should keep your group size as low as possible and allow as much flexibility in your departure dates as possible.
Southbound Permits (Starting from Yosemite)
If you wish to hike the JMT Southbound starting in Yosemite National Park, you will need to submit to a weekly lottery approximately 6 months before your planned departure date. Beginning in 2022, there is a $10 application fee every week you enter the lottery. Applying for the lottery allows you to choose one or all days of that week as possible starting dates. You can also choose the option to start at Happy Isles Trailhead or Lyell Canyon (Tuolumne Meadows) (both must have Donohue Pass eligibility)
In past years you had the option of staying at Little Yosemite Valley for your first night after starting at Happy Isles, however since 2022, ALL Happy Isles permits required you to bypass Little Yosemite Valley.
1. Happy Isles Trailhead: Happy Isles trailhead is the official start of the JMT and is the preferred starting point for most thru-hikers. If you start here, you will pass Half Dome, Nevada Falls, and other iconic Yosemite landmarks.
2. Lyell Canyon (Tuolumne Meadows): The Lyell Canyon option starts at the Tuolumne Meadows Ranger Station. It skips the iconic Yosemite landmarks including Cathedral Lake, but it avoids the steep climb out of Yosemite Valley and often has more availability.
Northbound Permits
Even though going Northbound is said to be somewhat easier in obtaining a permit, the reality is, you still need a permit! Going Northbound, hikers have a few options. One is to apply for the Mt Whitney lottery in February to March which would allow you to start your hike at Whitney Portal – the same way most SOBO hikers exit. This is a highly, highly competitive permit as only 35% of applications are successful (applications are in the 10,000-15,000 range!). Here you are competing with day hikers and those whose only goal is to summit Mt Whitney.
Otherwise, hikers will look for a permit with the Inyo National Forest from a few trailheads. Again, these are competitive to get and will be increasingly so as this trail continues in popularity. Alternative entry options are: Horseshoe Meadow, Cottonwood Pass or Cottonwood Lakes. These entry points are easier to obtain since you do not need a Whitney Portal exit, however it does add several days to your trek, making resupply options more limited.
Maps & Navigation
The JMT is one of the most well marked and heavily traveled trails in the high sierras, making it easy to follow. Unfortunately through the years any tree markings of the JMT (or PCT) have been removed, leaving hikers to follow the trail of fellow hikers, cairns and well worn paths left by those going before them. From June through August however, you will see plenty of people going both directions, so your chances of getting lost are quite small.
That said, you will still want a map to plan your trip and to assess routes along the way. We highly recommend both a digital and paper map if you can swing it. The advantage of the digital map is access to more camp recommendations as well as more recent data on water availability. However, as with all technology, things break or batteries die, which is why having a paper map is handy too.
- Guidebook to read about the trail and plan your route: John Muir Trail by Elizabeth Wenk
- Maps for on trail: Harrison, National Geographic
- Apps for on trail and planning: FarOut – JMT and PCT Download
Get in Shape / Prepare
The beauty of thru-hiking and hiking in general is that you can arrive at a trailhead in marathon shape or couch potato shape and succeed. What I know first hand is that while it is possible to take your unfit body up a mountain with a heavy pack, it makes the journey much more difficult than it needs to be. While you do not need to be in the best shape of your life, anything you can do to increase your aerobic fitness and leg muscles will help you along the way. Additionally, factor in some NERO days (easy mileage) as well as zero days (days off) during your trek plan.
What to Pack
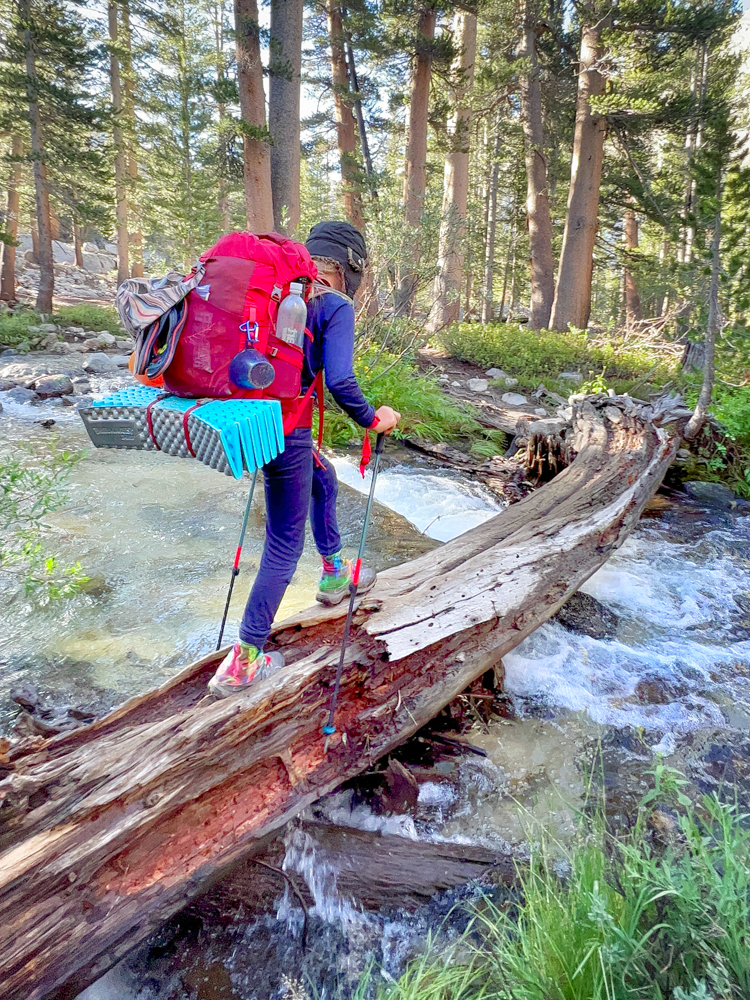
 Packing light is one of the most important aspects of backpacking, which leaves hikers with their favorite technique of layering! On my own thru-hike, temperatures ranged from the high twenties to the upper 80s, not to mention rain and hail. Avoid cotton, and use the lightest, most breathable fabrics you can find. Merino wool is our choice as it works as a layer for both hot and cold weather and wicks away moisture from rain or high river crossings quickly.
A lightweight puffy jacket for warmth is a must for the entire JMT season. Additionally, a rain jacket is also virtually a requirement for much of the season. Some hikers will even bring hats, gloves and rain pants.
The most important gear to factor in is your footwear. Make sure they are comfortable and work for you. Many thru-hikers prefer trail running shoes these days as they are lighter than the heavy stompers of the past. Consider wool socks, sock liners and bringing an adequate supply of blister treatments (leukotape is a favorite on trail). It is also highly recommended to size up at least half a size for all hiking shoes as your feet swell while hiking. Last but not least on the footwear supplies are hiking gaiters. These keep the millions of tiny foot stabbing rocks out of your shoes throughout the hike.
Other must haves on this trail include:
- Bear canister for proper food storage
- A trowel for burying toilet waste and a WAG bag for the Whitney area
- Water purification system (a filter, pills, or drops) and water storage (bags or bottles)
- A stove, cup, eating utensil and a food cozy to reheat your repackaged meals
- A first aid kit
- Trekking poles: in addition to saving your knees and helping you balance on tricky rock sections the are often used to hold up lightweight tents
RELATED POST: Backpacking Essentials & Hacks on Packing Light for Beginners
What to Eat
One of the biggest questions we get is “How do you carry all of your food?”.
The truth is, most people cannot carry all of their food with them for the entire trek. Instead, hikers rely on resupply options along the trail. Most hikers send at least one food drop – a bucket of supplies – to themselves along the route. Options include the post office at Tuolumne Meadows, a dip into town at Mammoth Lakes, Red’s Meadow, a detour to the backpackers paradise of Vermillion Valley Resort, Muir Trail Ranch, a mule resupply from Bishop to Kearsarge and hiking down to Independence.
No matter how many resupply drops you opt for, the one thing all of these buckets have in common is a lot of calories! Whether you are eating a vegan diet, protein rich or carb centered, you will need a good deal of calories to get you through each day. Some ideas for meals include oatmeal, instant mashed potatoes, packets of tuna or chicken, peanut butter, tortillas, a ton of candy, ramen and freeze dried meals.
Hikers carefully calculate the mileage they can hike between supply drops and how many days of food they will need for each section. It’s a lot of guesswork, but the reward is carrying just what you need without waste or running out. Getting this right is the challenge as there are so many factors on the trail that change your eating habits – altitude sickness, lack of an appetite, increased appetite, hiking faster or slower than planned, etc.
JMT hikers can also make use of so-called hiker boxes. These are often found at typical resupply points and the few businesses along the trail. Hiker boxes typically contain anything the last hikers to come through had too much of—from socks to stove fuel to sunscreen to food. For many thru-hikers, these boxes serve as their entire resupply plan. Etiquette note: it’s considered bad form to clear out all the good stuff!
Where to Sleep
 Unlike on some other thru-hikes, the JMT does not have specific shelter options in the backcountry. Instead, hikers can camp almost anywhere that meets Leave No Trace principles.
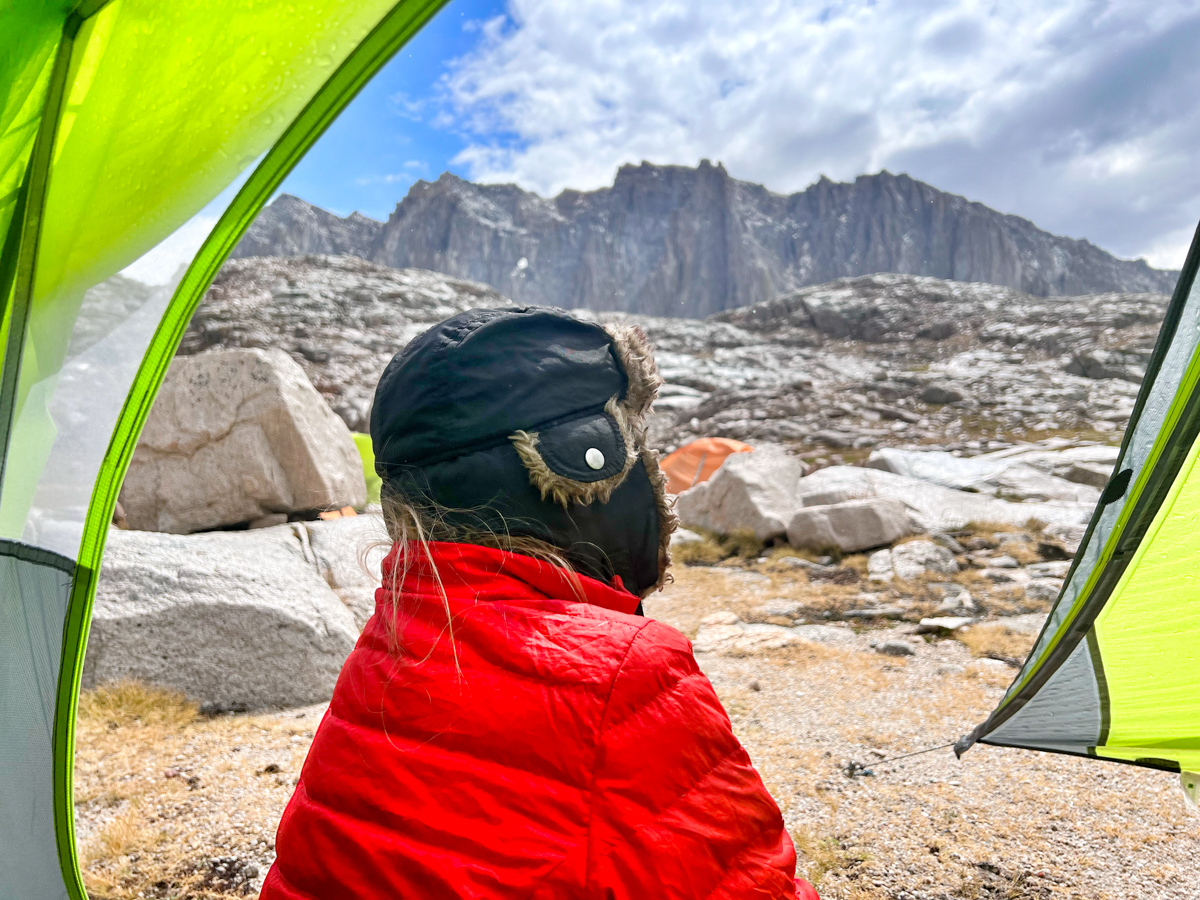
Thru-hikers typically carry some sort of shelter. Small bivy tents, lightweight tents, and hammock systems all have their advocates. Depending on how you prioritize comfort, weight, and protection from weather and bugs, will determine what you bring. Personally, I prefer a lightweight double-walled tent. You will also need a sleeping bag or quilt and a sleeping pad. Hikers recommend anything from a 10-20 degree sleep system as it does get quite cool in the high sierra throughout the season.
Trail Safety
No reliable statistics size up the prevalence of crime on the various long thru trails in the United States, but most hikers conclude that the back country is a reasonably safe place to be in this regard. The main causes of injury and death on the trail are due to personal medical issues and mother nature. The greatest threats to hikers on the JMT include hypothermia, lightning strikes, and high river crossings.
Hiking with a partner is safer than hiking solo, but a great deal of hikers do this trail on their own safety. What often happens is that solo hikers end up starting on the first day with other hikers who go at the same pace as them. Over time or even very quickly many solo hikers create a ‘tramily’ – a trail family – who move end up camping and taking zero days together on the journey.
Wildlife encounters tend to be what people worry about most, but end up being a magical part of the experience rather than something to fear. Bears, deer, coyotes, marmots and a host of other animals—might attempt to raid your food stash which can be an annoyance more than anything. In most parts of the John Muir trail, bears are present, but not seen. Only in areas with higher numbers of overnight or weekend hikers are the bears becoming more of a nuisance.
Thru-Hiker Etiquette
 One thing you find on the John Muir Trail is that your fellow hikers are ultra friendly, harking back to the days when people spoke to everyone they met in a day. Here you will find that every thru-hiker you pass offers at the least a greeting of hello, but more often than not will stop for a quick (or long!) chat.
The level of camaraderie, helpfulness and general be-nice-to-others mentality is above and beyond. Hiking for days on end away from civilization seems to do this to folks. Besides being friendly, the most important aspects on trail are following Leave No Trace principles. This helps protect the trail from the masses that descend on it each season.
Leave no trace. Pack out what you pack in and disposing of human waste properly being the biggest factors to understand.
Stay on the trail to help prevent erosion. Don’t cut the switchbacks, and whenever possible, walk in the middle of the trail, even if it’s muddy, rather than on the edges.
Carry your own weight! Sure, hiking light is the goal, but it’s not cool to carry so little that you end up asking other hikers to borrow the things you didn’t want to haul.
John Muir Trail Section Overview
 Yosemite National Park
Happy Isles to Donahue Pass (0 to 37 miles)
The John Muir Trail traditionally begins at the Happy Isles trailhead in Yosemite Valley. The first section of the trail climbs steeply out of the valley passing by iconic landmarks including Vernal Falls, Nevada Falls, Half Dome and with a detour, even Clouds Rest.
This section of the trail goes through the popular day hike and weekend backpacking destination of Cathedral Lakes before heading towards the road and Tuolumne Meadows and the first possible resupply point. After getting a cold drink and resupply, hikers head up the beautiful meadows of Lyell Canyon before crossing the first mountain pass of the trail – Donahue Pass.
Ansel Adams Wilderness & John Muir Wilderness
 Donahue Pass to San Joaquin River Bridge (Miles 37 to 112)
At the top of Donahue Pass, hiker officially leave Yosemite National Park, entering one of the most beautiful sections of the Inyo National Forest which includes both the Ansel Adams and John Muir Wilderness. The JMT goes through lake filled valleys and steep mountain passes here. Through this area there are several options for resupply at Red’s Meadow, a day trip to Mammoth Lakes, a detour to backpackers favorite Vermillion Valley Resort (VVR) and finally at Muir Trail Ranch. Many hikers prefer the detour by foot or boat (for a fee) to VVR as they cater to backpackers needs with resupply options in their store as well as hiker boxes. The new owners are fantastic and will also drop hikers back off to the trailhead. The last resupply point in this area and on the JMT is Muir Trail Ranch – just a shack in the woods with your pre-mailed resupply and daily hiker buckets, but no food or cold drinks available. If the river is low enough however, hikers can relax in the nearby Blayney Hot Springs.
This section takes hikers over two more mountain passes including Silver Pass and Selden Pass.
Kings Canyon National Park
 San Joaquin River Bridge to Forester Pass (Mile 112.6 to 187)
Entering Kings Canyon National Park signals the beginning of the biggest mountain pass climbs on the trail taking hikers all the way up to 13,200 feet. From these spectacular mountain tops you can take in the stunning views of the Sierra Nevada mountains. Here hikers will pass through Muir Pass, Mather Pass, Pinchot Pass, Glen and Forester.
A fan favorite is the infamous Rock Monster/ Whale Rock off the trail after Starr Camp.
This section of trail is also when you will have your last option for a resupply – either hiking down Kearsarge Pass to onion Valley or by hiring a mule train to deliver your goods on trail. This section ends at Forester Pass, which marks the border between Kings Canyon and Sequoia National Parks and is the highest pass on the JMT (and the PCT) at 13,200 feet.
Sequoia National Park
 Forester Pass to Mount Whitney (Mile 187 to 211)
Once you pass the arduous and much dreaded Forester Pass, the last section of the trail is all about getting to Mount Whitney the highest point in the contiguous US. Moving down into the Tyndall Creek area and across the Bighorn Plateau will be a much needed mellow section before the ascent to Whitney. Passing through Crabtree Meadows and Guitar Lake, hikers will say their last goodbyes to the trail as they make the climb up to Trail Crest and finally to Mt. Whitney.
After summiting Whitney hikers have a short but steep climb up before their long 9 mile descent downhill to reach Whitney Portal. Once you have climbed the highest peak in the Sierra Nevada Mountains though, getting down is your last hurdle! This is the gateway back to civilization where you can shop in the small store, eat and find your way down to Lone Pine. Here you can hitch a ride back to town and organize transport with Eastern Sierra Transit to get where you need to go. We left our car at Whitney Portal which was great for us to then drive back home.
Resources & Essential Reading
These days there are a myriad of excellent sources to get up to date information on hiking the John Muir Trail. For many, the online Facebook groups provide the best information from hikers who are currently on trail, have just finished or who have completed the trail year after year. While this is a popular trail in the Sierra Nevada mountains, you can find a great deal of information online.
John Muir Trail Facebook Group
John Muir Trail Hikers 2023 Facebook Group
Have you hiked the John Muir Trail? Do you have hopes to? Tell us all about it in the comments below!
If You Enjoyed This Post, Sign Up To Receive Posts By Email or…
- Join us on Facebook for regular updates and related articles
- Check us out on Instagram to see what we are up to in photos
- Follow us on Twitter for links to great travel articles curated just for you
- Or share this post with others by pinning on Pinterest!
Great pics of the JMT!!
We (Blazer, Muirman, and me “Mailman”) are getting settled back into our lives, but we sure miss being on the trail.
How are you and Cian doing?
Doug “Mailman”